The idea behind autotagging is that you don't have to enter all of the time manually. For example a visit to facebook.com is most likely always Surfing, similarly using Outlook can always be Email. These rules may be different for each of us, but the fact that we repeat certain tasks each day is not.
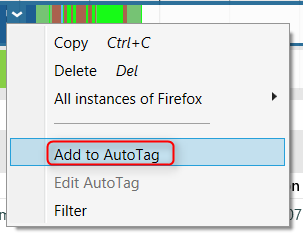
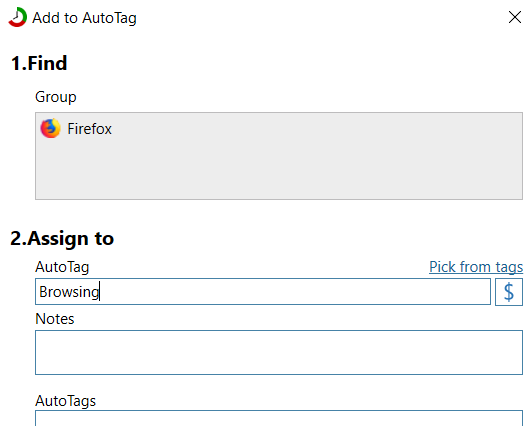
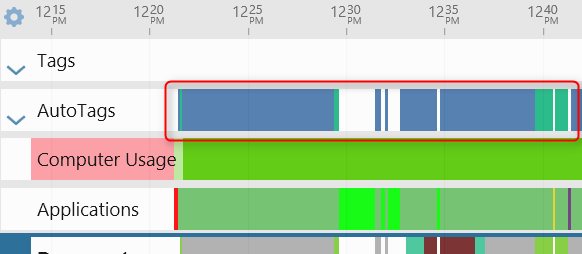
To add Autotag timeline, right click on some activity you want to autotag and choose Add to autotag. In the image below, I'm adding all Firefox usage to autotag "Browsing"
Take a look at this video for a more visual explanation.
If there is no autotag timeline, ManicTime will offer to create one for you.
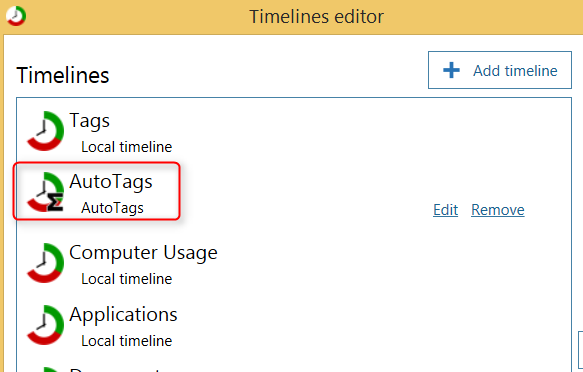
You can also add Autotag timeline manually. Go to Timeline editor -> Add timeline and choose Autotag type.
Creating autotags
Before we add our first rule, lets spend a couple more words on the nature of autotagging. Autotags are just rules, so they will work on any day in the past. This is the main difference between tags and autotags:
- Tags are created manually
- Autotags are calculated based on rules you define. That means that when the rules change so do autotags.
One more thing to keep in mind is that autotags can be more general or more specific than tags. For example lets say you check the news when you come from lunch. With manual tags you probably just assign those 20 minutes to 'Browsing, News' and you don't care if it was facebook, news about space or weather. With autotags it is very simple to make this tags more specific, so for example 'Browsing, Weather', 'Browsing, Social networks'....
On the other hand, when you tag some work manually you can be very specific, for example 'ManicTime, Help, User X' with note 'Help about autotags'. This level of detail is almost impossible with autotags. I can say when I visit 'www.manictime.com/support' tag as 'ManicTime, Help', but its impossible for me to create a rule which would know whom I was helping. So autotags can sometimes be more general and sometimes more specific.
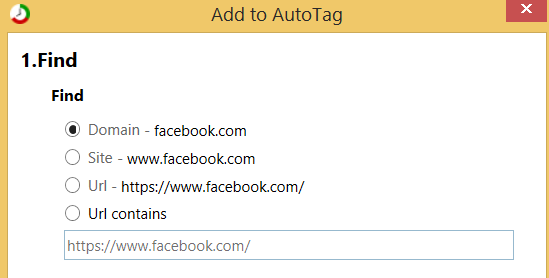
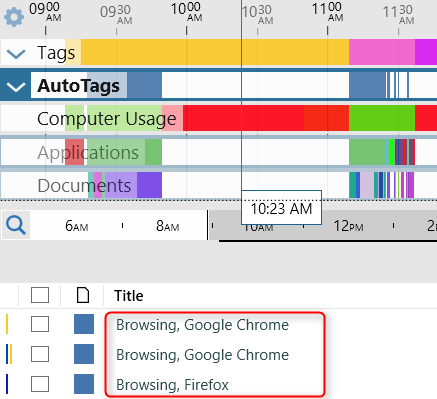
Now we are ready to add some rules. Right click on any activity on any timeline (usually rules will be based on Applications or Documents timeline) and click on Add to autotag command.

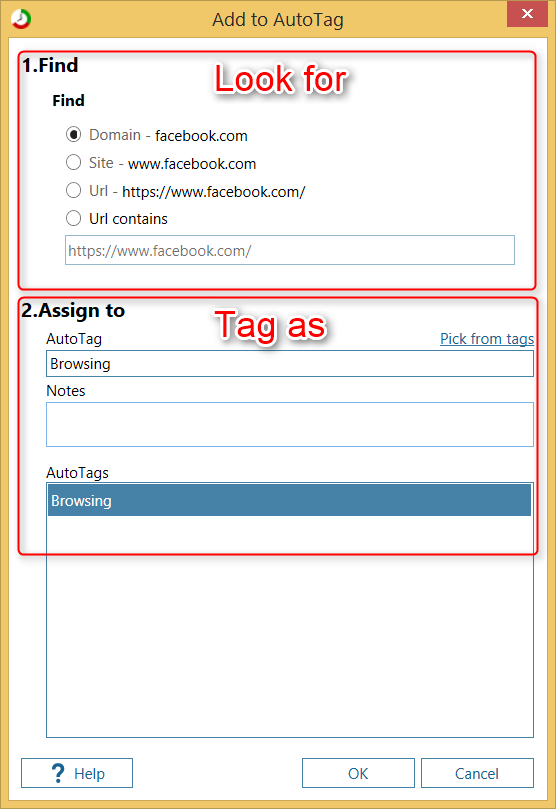
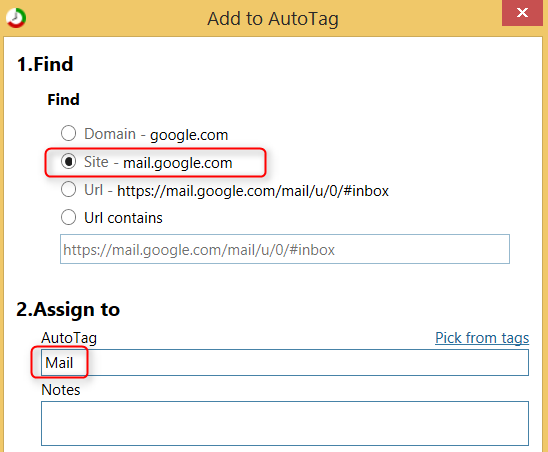
Top part of the Add to autotag window shows the rule, so what ManicTime will look for. Bottom part is the tag to which you want this rule assigned. Lets say you want to tag 'facebook.com' as 'Browsing'.
Once you click Ok, autotag timeline will start to fill up. You can make any number of rules.
Matching
'Find' part will change based on the underlying data. So if you click Add to autotag on an URL, you will get view tailored to URL.
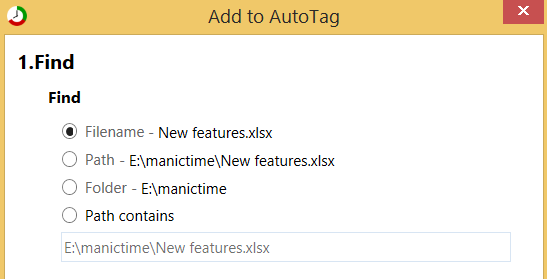
Similarly clicking Add to autotag on an Office document will show this:
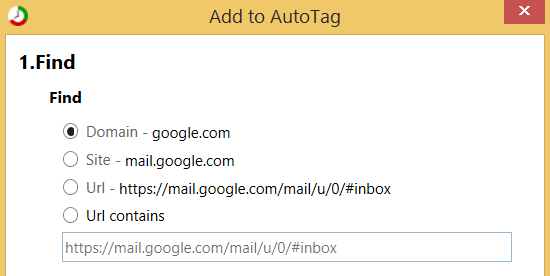
Lets take a closer look at URL example. Most of you are probably familiar with GMail. When you are using it, ManicTime will show URLs similar to this one on the Documents timeline
https://mail.google.com/mail/u/0/#inbox
So the question is, how can you set up an autotag for GMail? When you right click on one of the GMail URLs in ManicTime, you get this window
The first option is no good. You don't want every visit to google.com (search, email....) result in Mail autotag.
In this case you need to pick the second option.
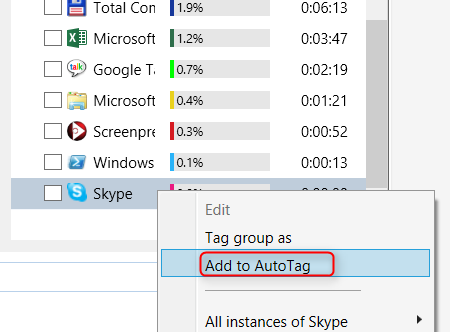
Lets take a look at another example, lets say you want to autotag Skype as 'Communication'. You can do this by clicking on Applications timeline to select it. Then in the bottom right, you need to right click on Skype and choose Add to autotag.
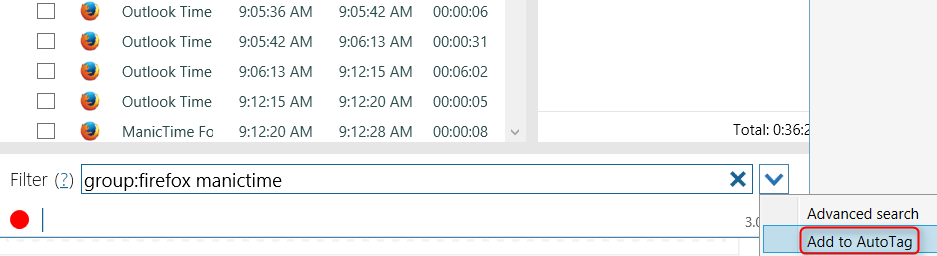
Add to autotag window is helpful when adding rules, but sometimes you need to add your own more complex rules. Let's say that you want to autotag all activities where you've used Firefox and there is a word 'manictime' in title. Click on Applications timeline to select it, then in the filter at the bottom write:
'group:firefox manictime'
Then click on the down arrow on the right side and choose Add to autotag to add current filter to autotag.
Copying autotags to tags
While tags are always created manually, autotags are calculated for each day separately. When the rules change, so will the autotags. If you are doing any kind of billing, you usually want your history to remain the same. With autotags, summary can be completely different six months from now. That's why we included an option to copy autotags to tags. When you copy autotags to tags, tags are created just as if you would create them by hand.
You can copy autotags to tags on any given day. You can copy all autotags for a day or you can first make a time selection and then copy just those which are within the selected time. To copy autotags to tags, click on 'Copy autotags to tags' button. In the image below, autotags will be applied only to the selected section.
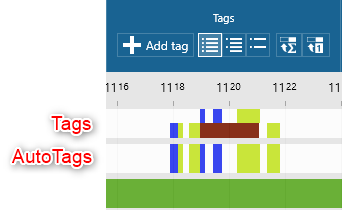
When copying autotags, there is a possibility that the same time was already tagged. In the image below, I first manually created a tag, then selected the same time and clicked on copy autotags to tags.
ManicTime will detect that by copying autotags to tags some of the tags will overlap. When this happens you will see the following dialog.
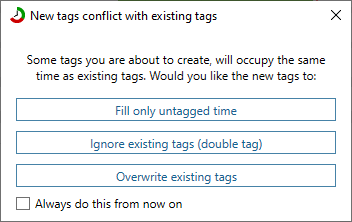
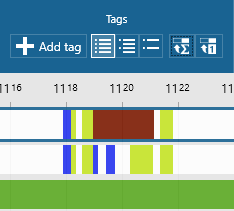
Result of all three choices can be seen below.
 |
 |
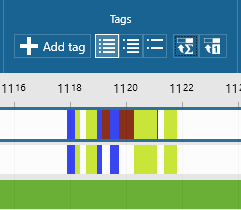 |
| Double tag | Tag only untagged time | Overwrite existing tags |
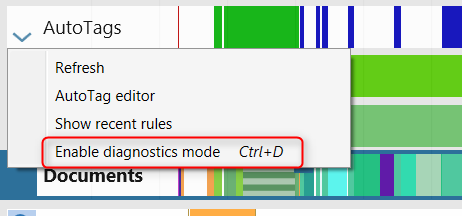
Diagnostics
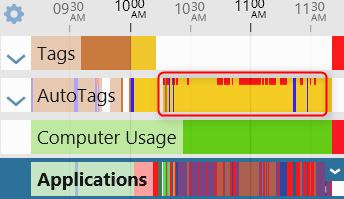
There will be times when you won't be sure why it works in some way. When that happens you can enable Diagnostics mode and it should tell you more about what rules were applied where.
Tooltip will then show a description like:
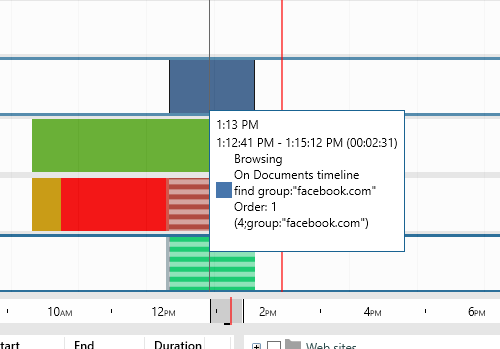 |
| Autotag diagnostics tooltip |
Append or Prepend (autotag type)
Lets explain Appends on an example, lets say we have these two autotags:
- Computer usage timeline - Active time -> autotagged as "Work"
- Applications timeline - IE -> autotagged as "Browsing"
These two autotags overlap, since while you are browsing you are also active. By default those two tags will be shown on two separate lines.

Lets now change the "Browsing" autotag to type Append in Autotag editor.
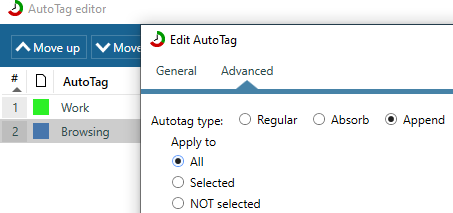
Once we change it to Append, it will be appended to "Work", so on some sections you will see only "Work", on some "Work, Browsing"
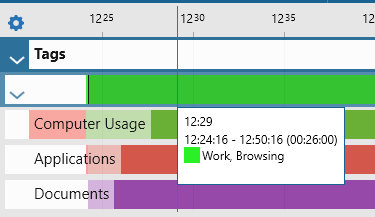
Append autotag only works if another autotag is matched to the same time range and it will not show up by itself.
Prepend works the same as Append, the difference is that autotag will be prepended first, not appended last.
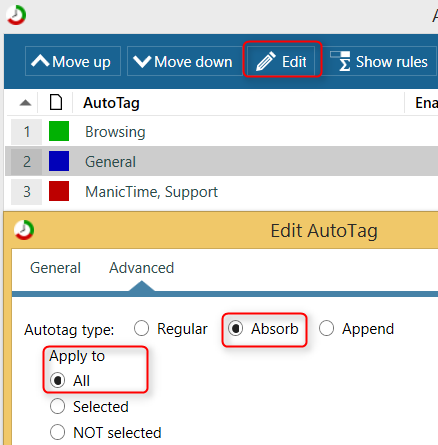
Absorb (autotag type)
The idea behind absorption is that when we work on something we stick to the same task for some time, we don't change focus every second. So for example let's say you are writing a novel in Word. You are using Word for 20 minutes, then jump to Google for 1 minute and back to Word for another 20 minutes. Chances are that jump to Google is related to your novel. In ManicTime you can make a list of these tools which can be used for any purpose (like Google in this case) and ManicTime will absorb them into surrounding activity.
Lets take search engines for example, you never know what you will use it for, maybe it is work related, maybe it is to check the weather, buy a new camera... Whenever you find something which can be used for any purpose, put it in the 'General' autotag.
Similarly you will have some tools, like Notepad or Windows explorer, which you know you use for work, but don't know in advance on which project. Put these in 'Work tools' autotag.
The key to absorption working reliably are rules which can only be one thing (let's call these rules 'hard rules'). For example these are rules like:
A visit to facebook.com -> autotag as 'Browsing'
Using outlook on support@manictime.com email -> autotag as 'ManicTime, Support'
Using Excel with documents in folder c:\accounting -> autotag as 'Accounting'
When generating autotags, ManicTime first calculates these, then it will turn the ones which are set for absorption into one of these.
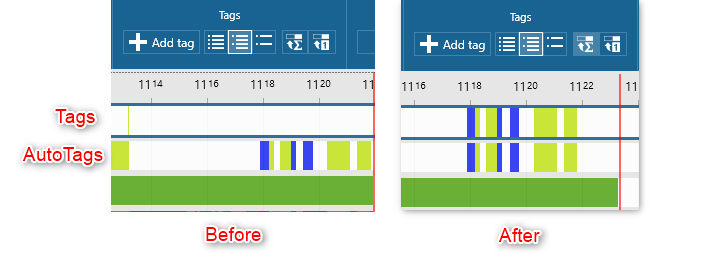
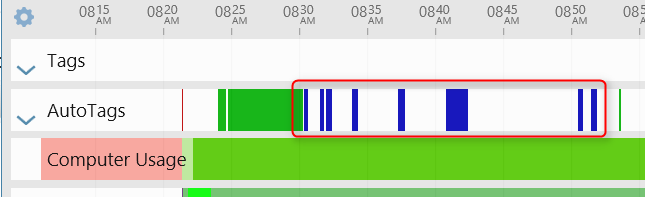
In the example below the red and green autotags are based on some rules, the blue highlighted one is Google search.
Now let's set 'General' autotag to be absorbed by all other autotags.
This is what it looks like after the absorption is applied.
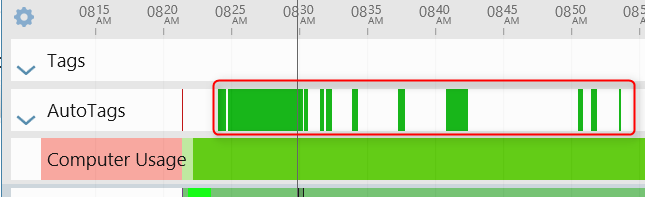
So now Google search was transformed into one or the other autotag. This might be a strange analogy for a computer application, but autotags set for absorption are similar to a chameleon, they will change color to whatever is in their vicinity.
Absorbed autotags will only be used when they are absorbed, they will not show up on their own.
Please note that while autotags can be correct, they can also be wrong. That visit to Google between working on a project could easily not have been related to a project, to which it was applied.
Making a mistake when adding a rule
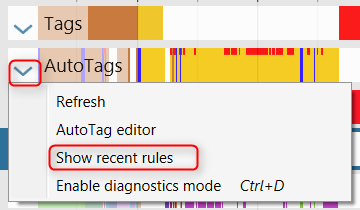
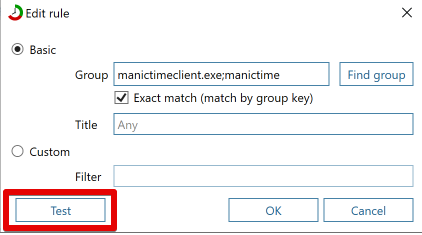
Once you start using Autotags, you will most likely make a few mistakes when adding rules. Click on the Show recent rules command. It will show all rules ordered by the date added. Right click on a rule and choose Edit or Delete.
Once you make the changes you can click on "Test button" to check which activities the rule will match.
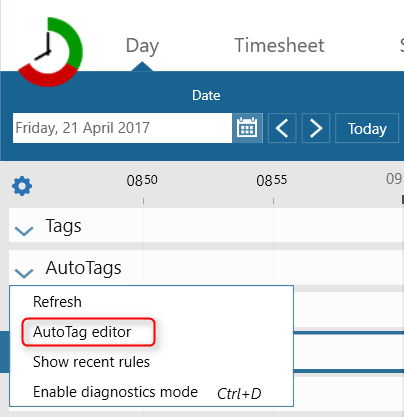
Autotag editor
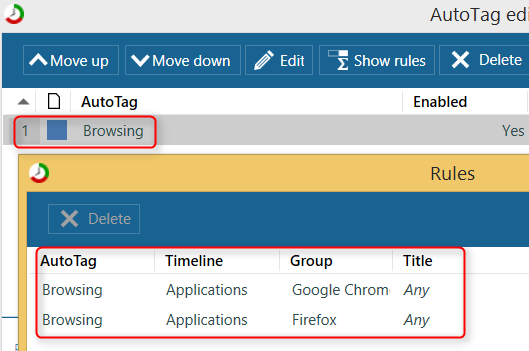
Sooner or later you will need to delete rules, rename autotags... you can do that in Autotag Editor. To open the Autotag Editor, go to the Day view, click on down arrow on the left of the Autotags timeline and select Autotag Editor.
For most of the commands on the top of the window, one or more autotags need to be selected in the list view below.
- Move up / down - Allows you to change the order of the tags. This is mostly useful when When first autotag is matched skip the rest option at the bottom is checked. When it is checked, ManicTime will first process first autotag, then the second one on all free time left (time which was not occupied by the previous autotag)....
- Edit - Allows you to change the name and color of the autotag, as well as set Absorption
- Show rules - Will display all the rules on the current tag. You can select more than one autotag and it will show rules for all selected autotags. On the rules editor you can delete the rules.
- Delete - Delete autotag and all its rules
- Export - Export all autotags to a text file, which you can import on some other machine
- Import - Import autotags from a file generated by Export
'Apply to all' options
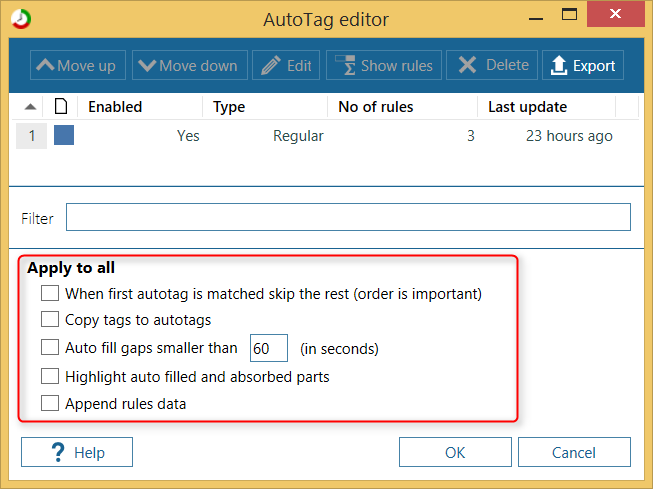
When first autotag is matched skip the rest
For example let's say you create two autotags:
- When you're using Outlook with title 'Client 1' -> Autotag as 'Client 1, Communication'
- When you're using Outlook -> Autotag as 'Communication'
When you are using Outlook with 'Client 1' in title, both rules will match resulting in double tag. If you check 'When first autotag is matched skip the rest', only one autotag will match. Which one will match depends on the order of autotags in the list view above the setting.
When setting is unchecked
When setting is checked
Copy tags to autotags
When checked, all tags will be be copied to autotags timeline. It is best used with setting 'When first autotag is matched skip the rest'. This way you can easily correct autotags by creating a tag where autotags are not correct.
Auto fill gaps smaller than X seconds
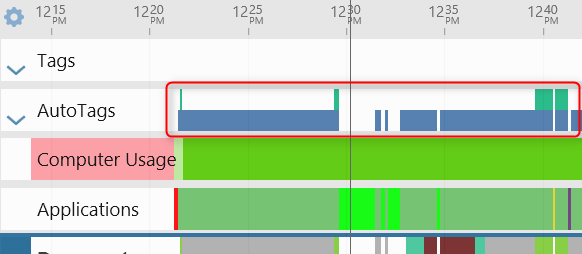
When you start autotagging, you'll notice gaps in autotags. A lot of them will be small gaps, like 10 second visits to sites you will likely never visit again. You can either autotag all this small sites, or you can use 'Auto fill gaps smaller than X seconds' setting. When this setting is checked, ManicTime will fill these small gaps itself. If the same autotag is on the left and on the right of the gap, ManicTime will use it to fill the gap. If a different autotag is on the left than on the right, ManicTime will divide the time equally to the left and to the right.
Please note that similar to Absorption, this feature is guessing as well. There is a good chance it is correct, but it can also be wrong.
Highlight auto filled and absorbed parts
I mentioned before that auto fill and absorption are two features where ManicTime is guessing a correct Autotag. When you enable this feature, ManicTime will show you these guessed parts on the timeline, so you can easily see which parts are guessed and when you need to fix it, add a rule.
Append rules data
This one is best explained on an example. Lets say you have autotag Browsing, which is hit if you use either IE, Firefox or Chrome.
This works Ok, but how about if you want to know how much time was spent on each of the browsers? Previously you would need to make autotags: Browser, IE - when using IE Browser, Firefox - when using Firefox Browser, Chrome - when using Chrome Now you can just check Append rules data and MT will automatically append this data, so you don’t have to make a lot of extra autotags.
Dynamic autotags
This is a more advanced feature. Most of the time, autotags have a predefined name, so you say application Word is part of autotag Work documents. But what if you want to add the name of the document to the autotag? Do we need to create a new autotag for each document?
(For a simpler version of this, take a look at Append rules data setting in Autotag editor.)
Let’s take a look at a more complicated example. Let’s say you use Excel and Word when you work for your clients. Let’s also say you save the documents in folders by client and project, like so:
C:\work\Client 1\Project 1\some docs...
C:\work\Client 1\Project 2\some docs...
C:\work\Client 2\Project 3\some docs...
C:\work\Client 2\Project 4\some docs...
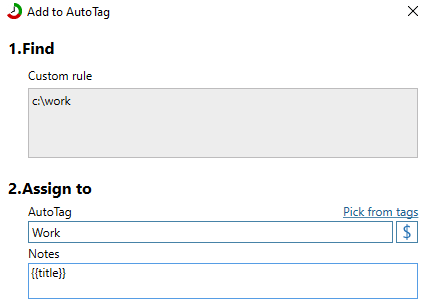
Lets try to create a simple autotag. Lets tag all Word and Excel usage as "Work" and lets add document we were working on to Notes. How do we do this?
First we are going to filter Document timeline so only documents from the mentioned folders show up. You can do this by typing c:\work to filter.
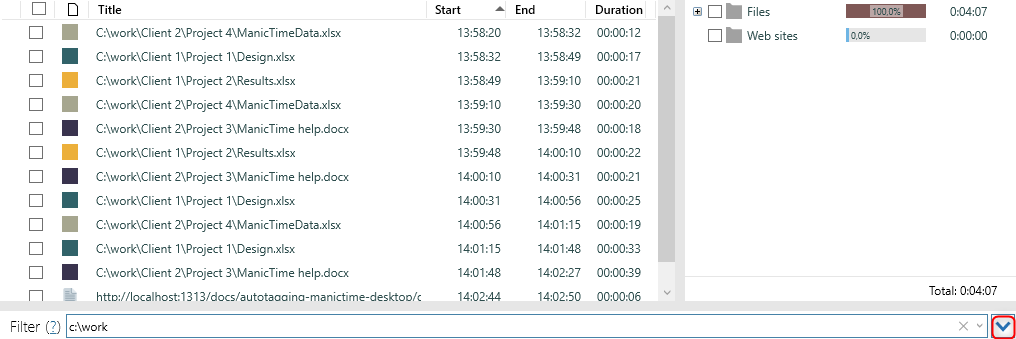
You can use this filter to create autotag. Click on the arrow facing down on the right side and choose Add to autotag. For autotag write "Work" and for the notes use a special keyword
{{title}}
This will insert any title which was matched by the rule.
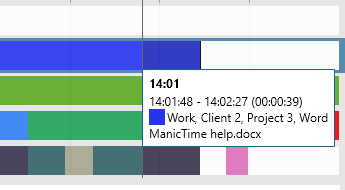
So after we do this our autotags are:
Autotag: "Work", Notes: "C:\\work\\Client 1\\Project 1\\some doc.docx"
We used {{title}} to insert document name to notes. The other reserved keyword is {{group}}. To understand the difference take a look at the Day view. Below the timelines on the left are details about activities, on the right are summaries. So for example on Applications timeline on the left are window titles, on the right is the application to which the titles belong.
So {{title}} will take the value on the left, while {{group}} will use the value on the right. You can use both keywords in Notes or in name of autotag.
We accomplished something, but we can make it better. Since we store documents based on client and project, wouldn’t it be great if we could use this for our autotags, so we would get something like
Autotag: "Work, Client 1, Project 1", Notes: "filename"
Regular expressions in Autotags
ManicTime supports regular expressions and we can use them to parse the filename. To write regex you need to enclose it in #”regex”. So in our example we will use
#"C:\\work\\([^\\]*)\\([^\\]*)\\(.*)"
I won't go into much details about regular expressions, you can read more about them here.
In short, there are three capturing groups inside the regex, which we can use in our autotag as {{1}}, {{2}}, {{3}}
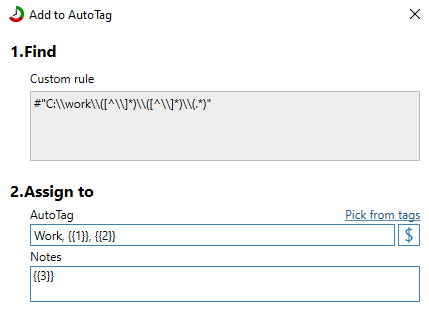
So now we get what we set out to do.
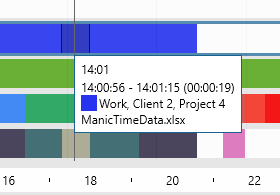
Lets do one more thing, lets say we want to know which application those docs were created with, was it Excel or Word? We will use Append tag for this. Right click Word on Apps timeline, choose Add to autotag and type Word. Then do the same for Excel. In the Autotag editor select Word autotag, choose Edit and on Advanced tab choose Append and apply to selected and choose "Work, {{1}}, {{2}}".
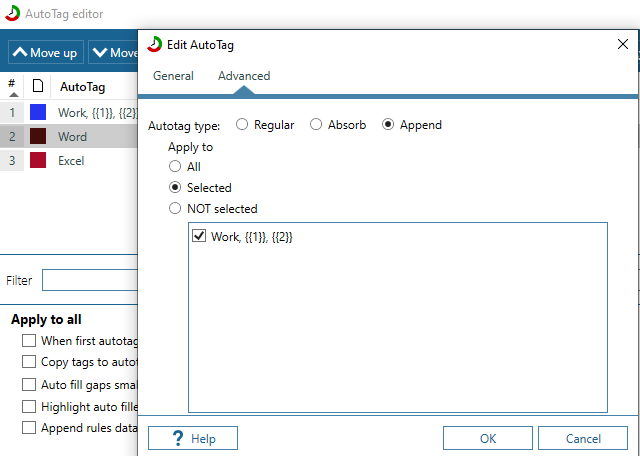
Then do the same for Excel, once you’re done you’ll get this.
So now you know for which client and project you were working, in which app you were working and also which document.
Autotag reports
You can use timesheet to generate Autotag reports. On the Timesheet, choose Autotags timeline as a source timeline.
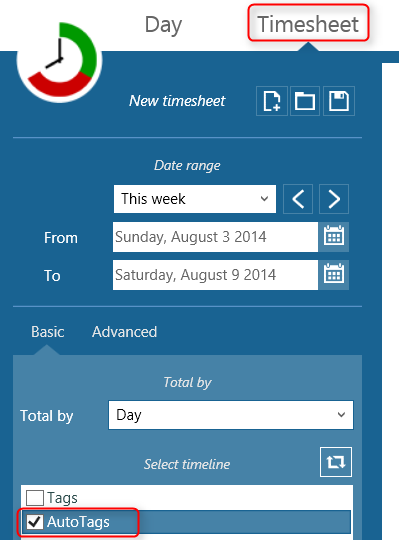
Timesheet work in the same way whether you use it for tags or autotags.
Syncing Autotags between devices
Autotags can now be synced across devices using ManicTime Server v4.4 and ManicTime v4.7 or newer. There will only be one autotag timeline per user on the server. If you will make changes to autotags on one machine, they will be synced to autotags on other machines.
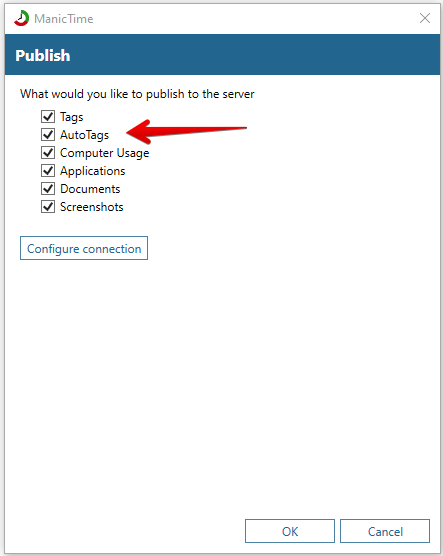
Publishing autotags to server
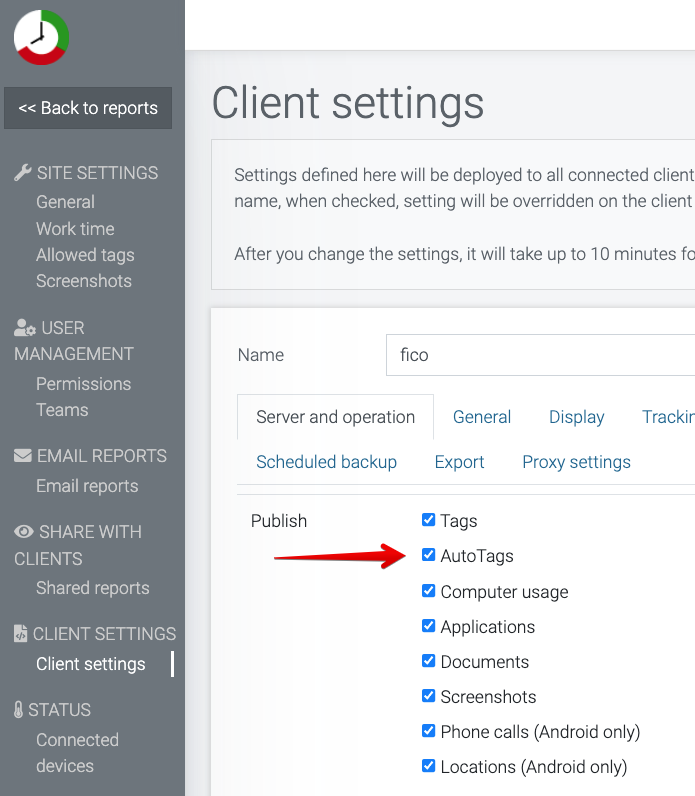
On ManicTime client you need to allow Autotags to sync:
If you have client settings enabled on the server, then autotags must also be allowed to sync on the server.
Once autotags sync from multiple devices, if you make changes to one autotag on one machine, changes will be synced to the other machines.
Applying autotags to timelines
By default ManicTime will apply autotags to local timelines. If you have imported timelines from other machines from cloud or ManicTime Server, then you can apply autotags to these imported timelines as well.
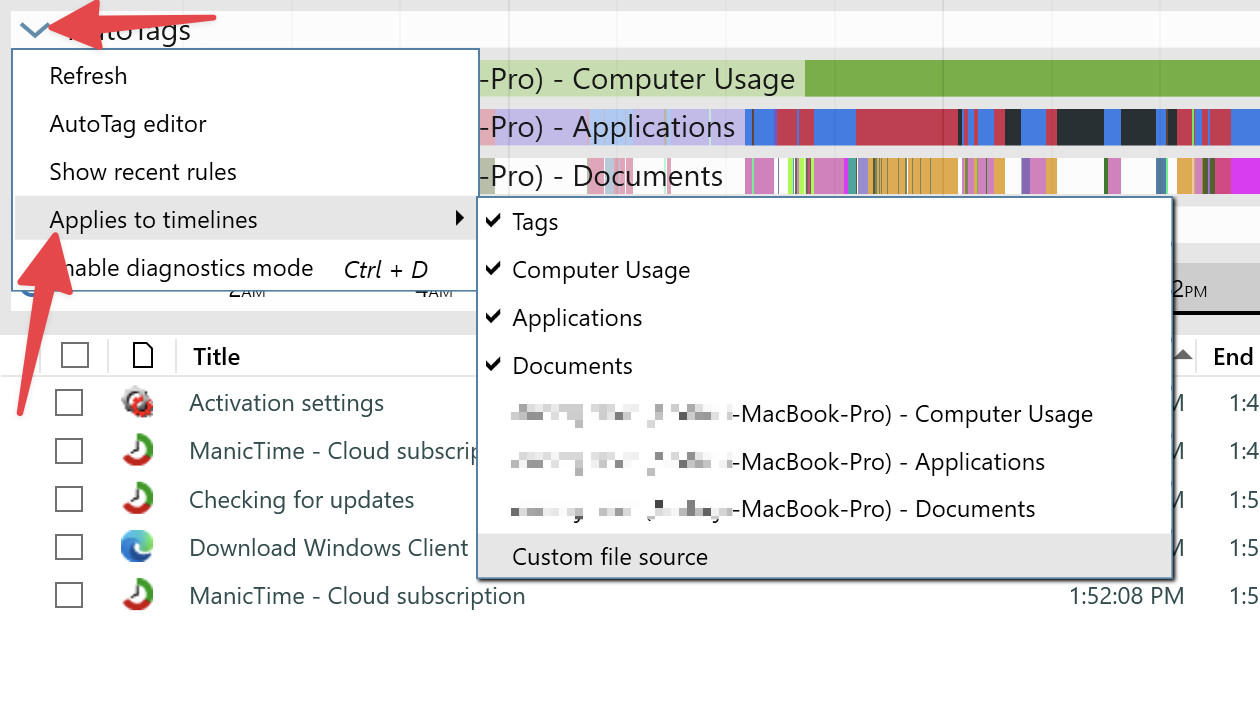
If you have autotag timelines on multiple machines
Only first machine will send autotags, on other machines, additional autotag timeline from server will show up. In this case, you can delete the autotag timeline which exists only on that machine and keep only the one coming from server.