ManicTime Server supports MCP (Model Context Protocol), so AI tools can query activity data, summaries, tags, screenshots, users, and teams from your on-premise ManicTime Server.
Most AI tools cannot authenticate directly to an on-premise ManicTime Server. For this setup, use ManicTime MCP Bridge. The bridge runs on your computer, signs in to ManicTime Server, and exposes a local MCP connection to your AI tool.
If you use ManicTime Cloud, see Connecting AI to ManicTime Cloud.
How it works
The bridge connects these two sides:
- AI tool → ManicTime MCP Bridge: local stdio or local HTTP connection
- ManicTime MCP Bridge → ManicTime Server: authenticated HTTPS connection to your server's
/mcpendpoint
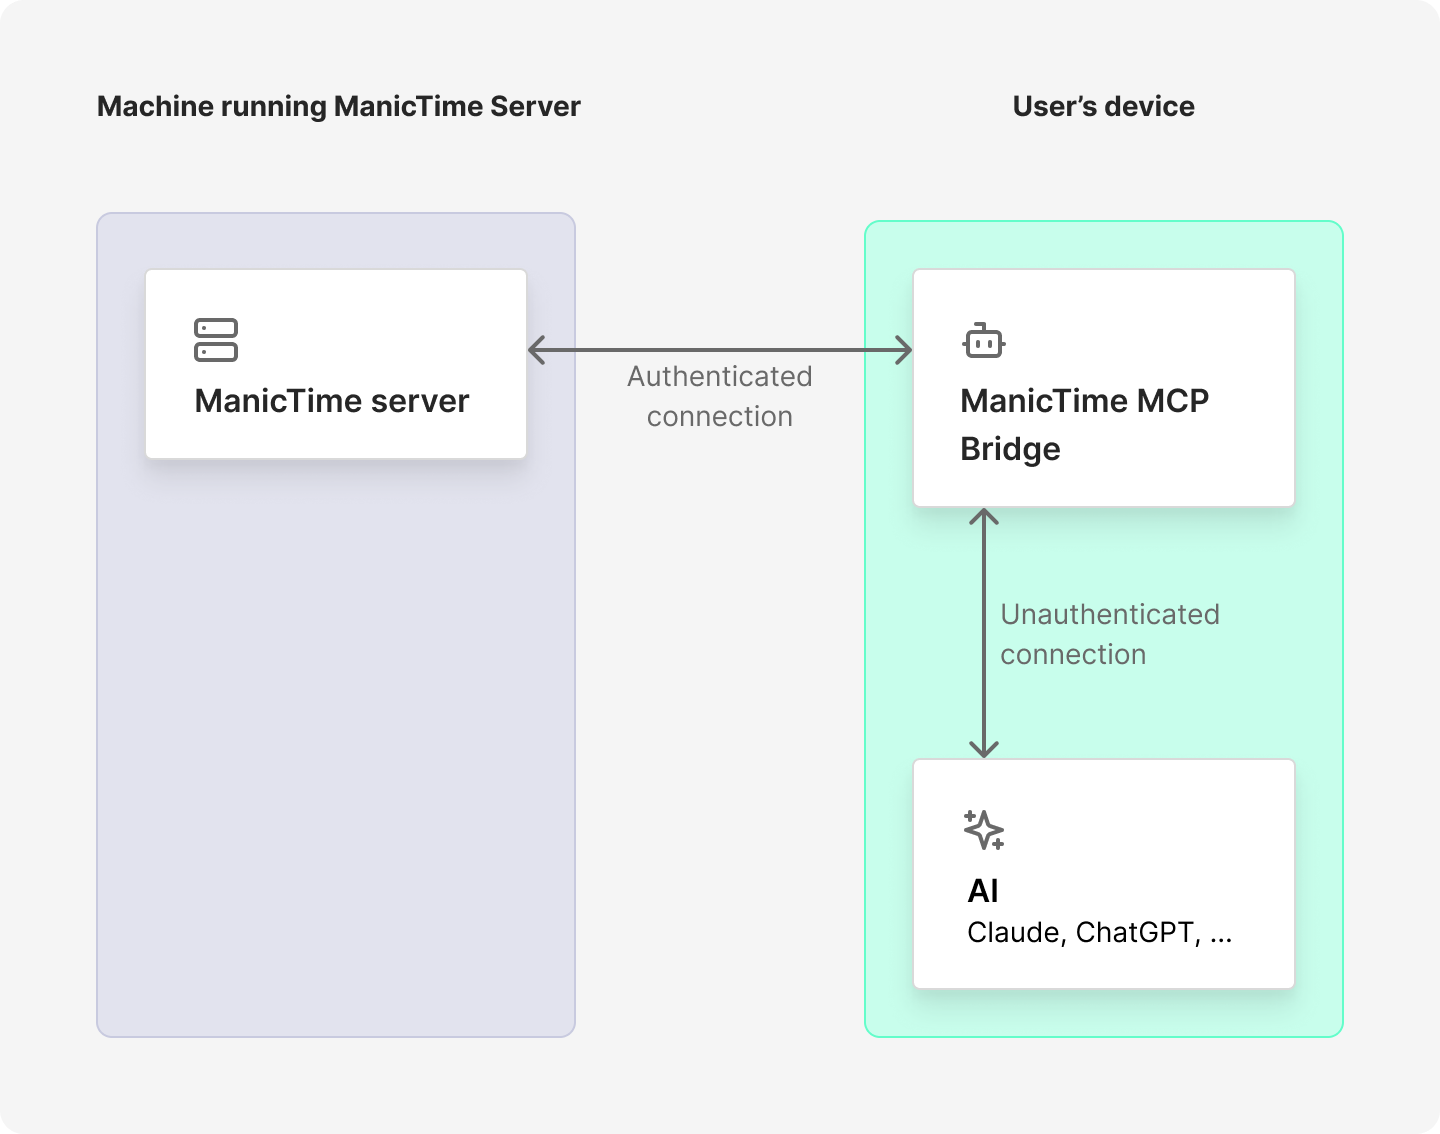
Your AI tool talks to the bridge locally. The bridge then forwards MCP requests to ManicTime Server as the user you configured.
What you need
Before you start, you need:
- ManicTime Server with MCP support (v2026.2 or later)
- ManicTime MCP Bridge for your operating system
- an AI tool that supports MCP
Download ManicTime MCP Bridge
Download and extract the package for your operating system:
The executable is named:
- Windows:
ManicTimeMcpBridge.exe - Mac and Linux:
ManicTimeMcpBridge
To see all available options, run:
ManicTimeMcpBridge --help
Choose authentication
The bridge supports two authentication methods, Windows and ManicTime. Use the one which your on-premise server uses.
Current Windows user
If ManicTime Server uses Windows authentication and you want to connect as the current Windows user:
ManicTimeMcpBridge --url https://manictime.example.com
Windows username and password
If ManicTime Server uses Windows authentication and you want to specify a Windows user, pass the username.
ManicTimeMcpBridge --url https://manictime.example.com --user DOMAIN\\user
ManicTime username and password
If you use a ManicTime account, pass the email address as --user. Email-style usernames use ManicTime authentication.
ManicTimeMcpBridge --url https://manictime.example.com --user sara@example.com
Setting up with AI tools
All integrations use the same principle: configure your AI tool to start ManicTime MCP Bridge as a local MCP server over stdio. The bridge then connects to your ManicTime Server.
The examples below use https://manictime.example.com as the ManicTime Server URL. Replace it with your server URL.
If you use a ManicTime account or a Windows user with a password, provide the password with --password or MANICTIME_MCP_PASSWORD. If --user is omitted, the bridge connects as the current Windows user.
Claude Code
Current Windows user:
claude mcp add manictime-server --transport stdio -- \
  "C:\Tools\ManicTimeMcpBridge\ManicTimeMcpBridge.exe" \
  --url https://manictime.example.com
ManicTime account:
claude mcp add manictime-server --transport stdio -- \
  /path/to/ManicTimeMcpBridge \
  --url https://manictime.example.com \
  --user sara@example.com \
  --password your-password
Claude Desktop
Open Settings → Developer → Edit Config and add:
Current Windows user:
{
  "mcpServers": {
    "manictime-server": {
      "command": "C:\\Tools\\ManicTimeMcpBridge\\ManicTimeMcpBridge.exe",
      "args": [
        "--url",
        "https://manictime.example.com"
      ]
    }
  }
}
ManicTime account:
{
  "mcpServers": {
    "manictime-server": {
      "command": "/path/to/ManicTimeMcpBridge",
      "args": [
        "--url",
        "https://manictime.example.com",
        "--user",
        "sara@example.com",
        "--password",
        "your-password"
      ]
    }
  }
}
Restart Claude Desktop after saving.
OpenAI Codex
Current Windows user:
codex mcp add manictime-server -- \
  "C:\Tools\ManicTimeMcpBridge\ManicTimeMcpBridge.exe" \
  --url https://manictime.example.com
ManicTime account:
codex mcp add manictime-server -- \
  /path/to/ManicTimeMcpBridge \
  --url https://manictime.example.com \
  --user sara@example.com \
  --password your-password
Visual Studio Code (GitHub Copilot)
Option A — UI:
Ctrl+Shift+P/Cmd+Shift+P→ MCP: Add ServerSelect Command (stdio)
Enter the command, for example:
C:\Tools\ManicTimeMcpBridge\ManicTimeMcpBridge.exe --url https://manictime.example.comEnter ManicTime Server as the server name
Option B — config file:
Create .vscode/mcp.json in your workspace:
{
  "servers": {
    "ManicTime Server": {
      "type": "stdio",
      "command": "C:\\Tools\\ManicTimeMcpBridge\\ManicTimeMcpBridge.exe",
      "args": [
        "--url",
        "https://manictime.example.com"
      ]
    }
  }
}
Open Copilot Chat and switch to Agent mode to use MCP tools.
Local HTTP transport
Most desktop MCP clients should use stdio. Use local HTTP only when your AI tool expects an MCP server URL instead of a command.
Start the bridge:
ManicTimeMcpBridge --url https://manictime.example.com --user sara@example.com --transport Http
By default, the bridge listens on:
http://localhost:8081
Configure your AI tool to use that URL as the MCP server URL.
Only bind to a non-localhost address if you understand the security implications. The bridge exposes access to ManicTime data for the configured user.
Command line options
| Option | Environment variable | Description |
|---|---|---|
--url, -s |
MANICTIME_MCP_URL |
ManicTime Server base URL. Do not add /mcp; the bridge adds it automatically. |
--transport, -t |
MANICTIME_MCP_TRANSPORT |
Local transport: Stdio or Http. Default is Stdio. |
--port |
MANICTIME_MCP_PORT |
Local HTTP port. Default is 8081. |
--bind |
MANICTIME_MCP_BIND |
Local HTTP bind address. Default is localhost. |
--user, -u |
MANICTIME_MCP_USER |
Username. Email addresses use ManicTime auth; plain usernames use Windows auth. Omit for current Windows user. |
--password, -p |
MANICTIME_MCP_PASSWORD |
Password. Required when --user is set and the bridge cannot prompt. |
--help, -h, -? |
Shows help and usage information. | |
--version |
Shows version information. |
Check that it works
When the bridge starts, it first checks that it can connect to the remote ManicTime Server MCP endpoint. If authentication or the server URL is wrong, it exits with an error.
After the AI tool connects, try:
- "Are ManicTime tools available?"
- "How much time did I work yesterday?"
- "Summarize my time by project this week."
- "Show total tracked time for everyone on my team yesterday."
- "Which users are visible to you?"
The data returned by MCP follows the permissions of the configured ManicTime Server user. Regular users can query their own data. Administrators and users with Content reader or Content writer permissions can query data for other users, teams, or everyone, according to their permissions.
For the full list of tools, see Available AI (MCP) tools.
Troubleshooting
If the bridge cannot connect, check:
- the
--urlvalue is the ManicTime Server base URL, for examplehttps://manictime.example.com - ManicTime Server is reachable from the computer running the bridge
- your account can sign in to ManicTime Server
- the password is provided through
MANICTIME_MCP_PASSWORDor--passwordwhen the AI tool starts the bridge through stdio - Windows authentication is used only with plain usernames, such as
DOMAIN\\user - ManicTime authentication is used with email-style usernames, such as
sara@example.com
If you use local HTTP, also check that the configured port is not already in use.