Jira plugin
For JIRA plugin to work, your site needs to have Accept remote API calls setting enabled.
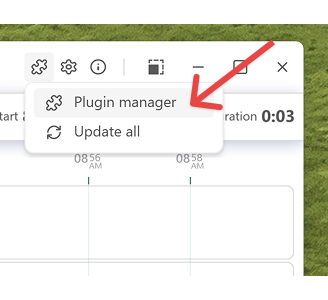
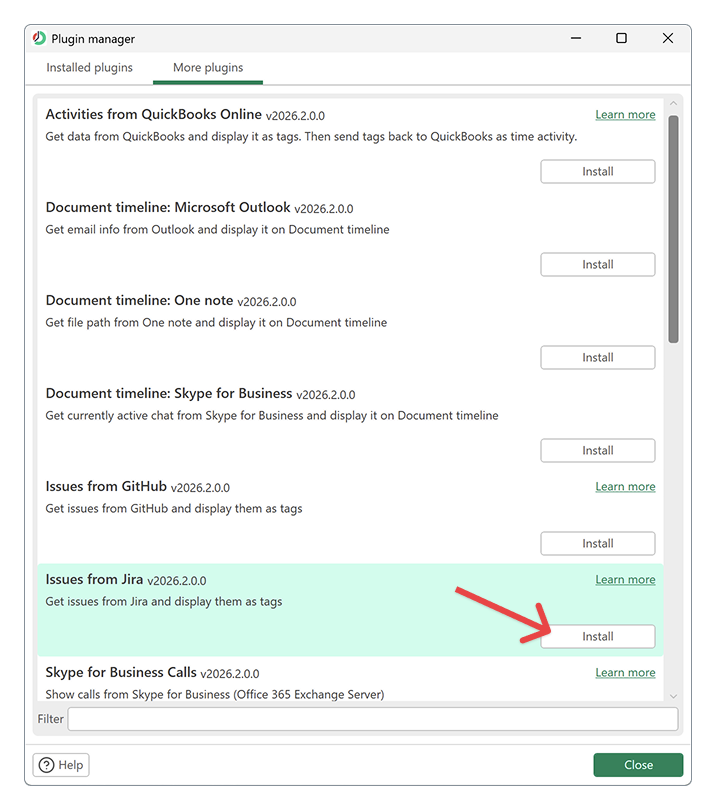
To get the Jira plugin, go to Plugin manager -> More plugins and install Jira.
Install Jira plugin
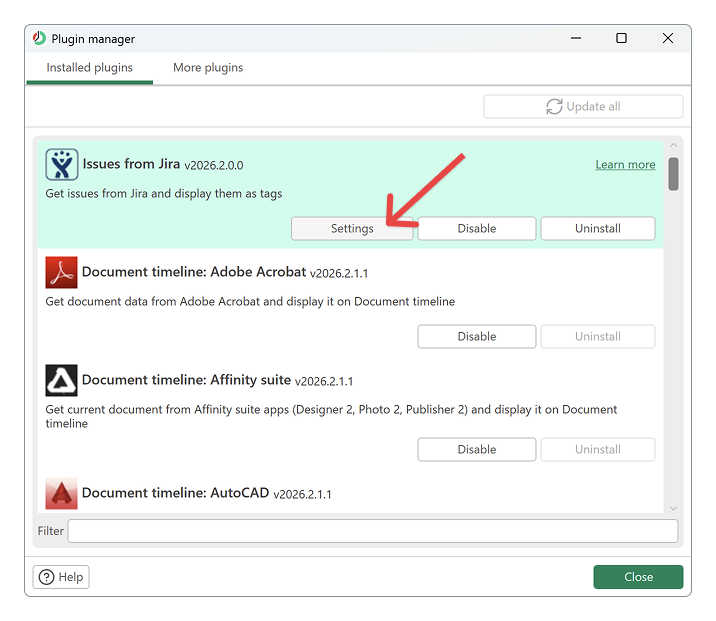
Once installed, click on Settings.
Issues from Jira will show up as tags within ManicTime. To setup a connection, you need to provide your username, password and a URL to your site within Jira if you are using Jira Server. You need to provide only URL to site, for example:
https://manictime.atlassian.net/
If you re using Jira cloud you only need to select Jira cloud and press connect.


Once you do, you can choose projects from which issues will be imported.
Issues will have the following format in ManicTime:
[project name], #[no. of issue - name of issue]
You can choose to also add closed issues.
You can leave starting tags empty. Whatever you write in Starting tags will be prepended to issue. For example you can write Work, then all issues will start with Work....
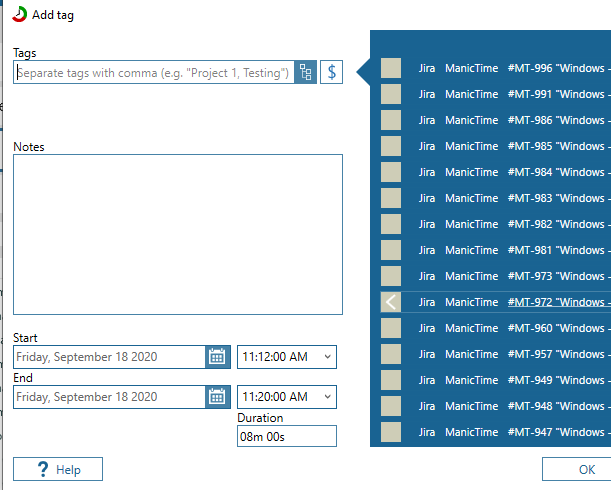
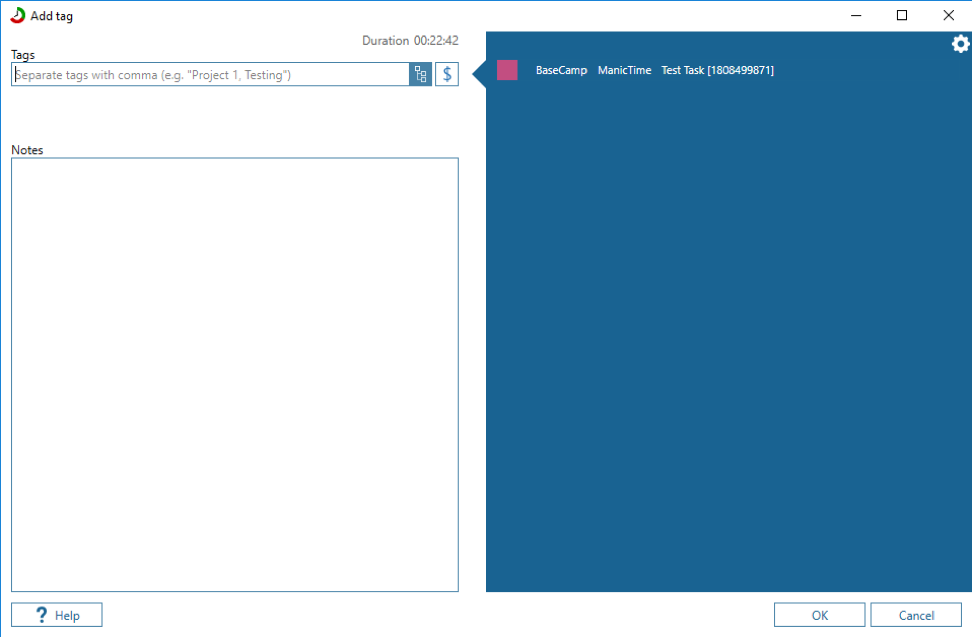
Once connection is established, Jira tags should be available in Add tag window, so you can use the issues in your tags.
Once you tag some time with Jira tags, you can transfer them back to Jira.

Tempo plugin (optional)
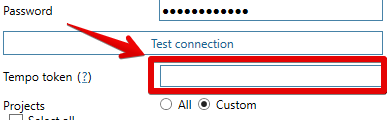
Tempo token is optional, if you do not use Tempo plugin in Jira just leave it empty.
By default, Jira does not provide a billable tag, so billable will not be transferred. Popular Jira plugin, Tempo, does support billable, so if you are using using Tempo plugin, ManicTime can also transfer billable.
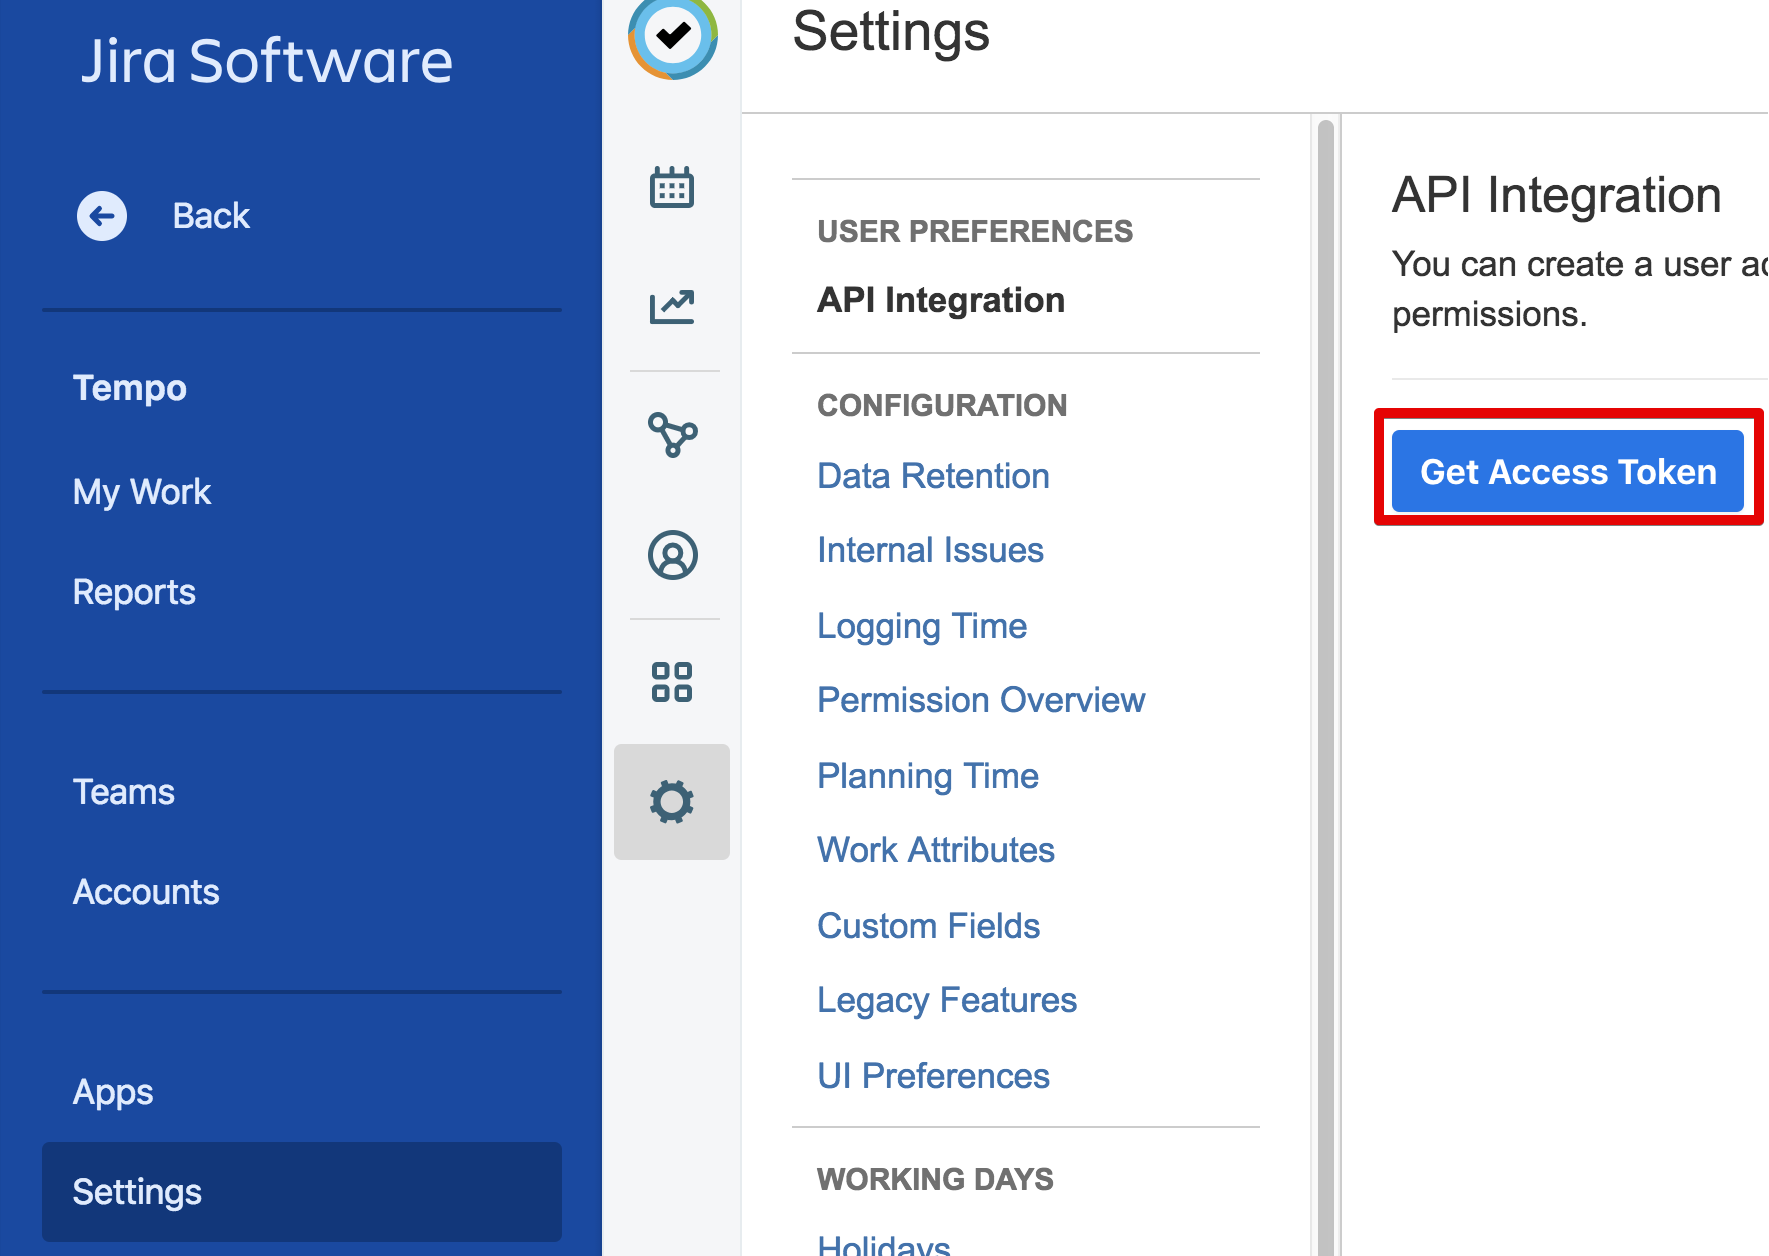
Your access to Tempo add-on should be enabled by your Jira Administrator and when you log in to Jira with your account, you should navigate from Jira Software -> Tempo -> API Integration -> Settings, then click on "Get access token".
Enter access token in our Jira plugin.
Now when you transfer tags to Jira, billable flag should be transferred as well.
QuickBooks Online plugin
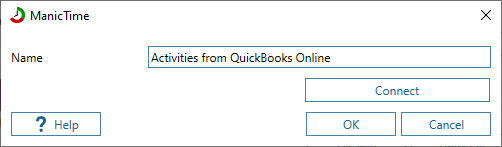
To use the plugin you must first install it. You can install it under Plugin manager, More plugins tab. Once it is installed, click on Settings.
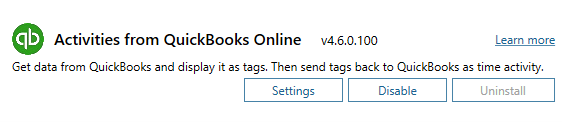
Then, you need to do is click Connect to authenticate.
After that you need to set hourly rate, if you want to send Billable tags back to QuickBooks Online.
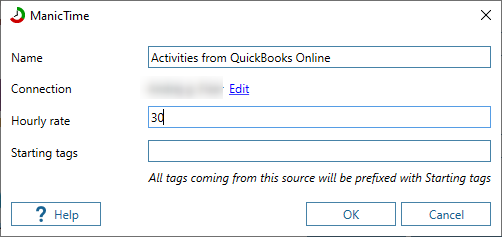
We suggest you prefix tags coming from QuickBooks Online with at least " QuickBooks " tag, so you can later identify them in Add tag window.
Tags from QuickBooks Online will look like
<any preceding tag you defined>, Project or Customer from QuickBooks[id]
<any preceding tag you defined>, Project or Customer from QuickBooks[id], Custom tag
<any preceding tag you defined>, Custom tag
As you can see you can define “your own” QuickBooks tags or add custom text to existing QuickBooks tags, but to use this feature you MUST set the Starting Tags field otherwise you can only use the first two formats.
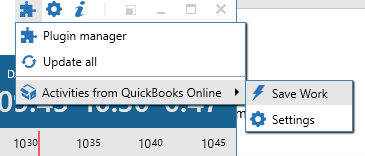
You can also send tags back to QuickBooks as time activities. All you need to do, is to go to Plugins -> Activities from QuickBooks Online -> Save work.
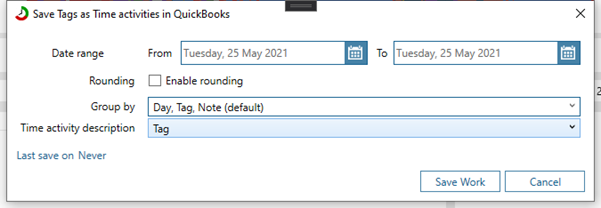
And then a screen will pop up, where you can choose, for which days you want to send tags as time entries to QuickBooks and if you like to round time or group tags and what do you want to send as time activity’s description back to QuickBooks online.
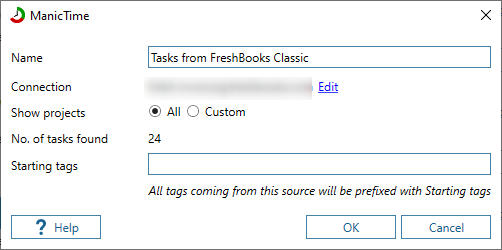
Freshbooks classic plugin
FreshBooks is a widely used accounting software, which you can now use with ManicTime.
This plugin will import tasks from FreshBooks, use them to tag your time, then push them back to FreshBooks as work.
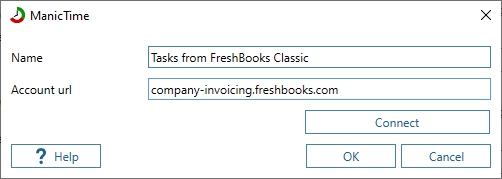
To use the plugin you must first install it. You can install it under Plugin manager, More plugins tab.
Once it is installed, click on Settings.

You need to enter your account URL, so for example companyName.freshbooks.com
 A web page will open up, where you need to confirm access to this account.
 We suggest you prefix tags coming from FreshBooks with "FreshBooks" tag, so you can later identify them in Add tag window.
Tags from FreshBooks will look like:
We suggest you prefix tags coming from FreshBooks with "FreshBooks" tag, so you can later identify them in Add tag window.
Tags from FreshBooks will look like:
preceding tag you defined, Project from FreshBooks \[id\], Task from Freshbooks\[id\]
Then open Add tag window and type FreshBooks in tag field to filter by FreshBooks. Create a tag.
 Then go to plugins -& Tasks from FreshBooks -> Save work
 This will send tags you created in ManicTime back to FreshBooks

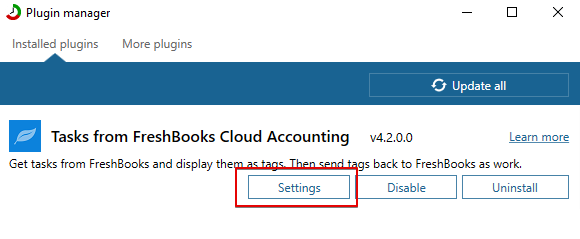
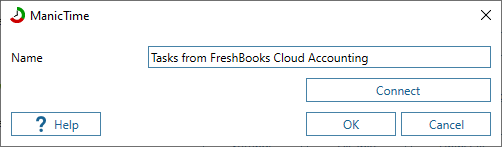
Freshbooks cloud plugin
FreshBooks is a widely used accounting software, which you can now use with ManicTime.
This plugin will import tasks from FreshBooks Cloud, use them to tag your time in ManicTime, then push them back to FreshBooks as work.
To use the plugin you must first install it. You can install it under Plugin manager, More plugins tab.
Once it is installed, click on Settings.
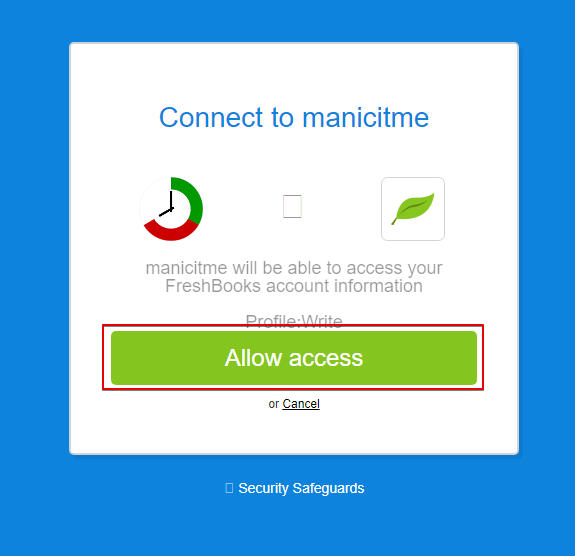
 Click on "Connect". A browser will open up, login, then authorize ManicTime, so it can access your account.
We suggest you prefix tags coming from FreshBooks with "FreshBooks" tag, so you can later identify them in Add tag window.

Tags from FreshBooks will look like:
<any preceding tag you defined>, Project from FreshBooks [id], Project service
Then open Add tag window and type FreshBooks in tag field to filter by FreshBooks. Create a tag.

Then go to plugins -> Tasks from FreshBooks -> Save work
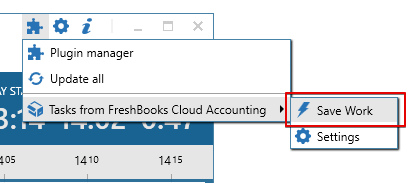
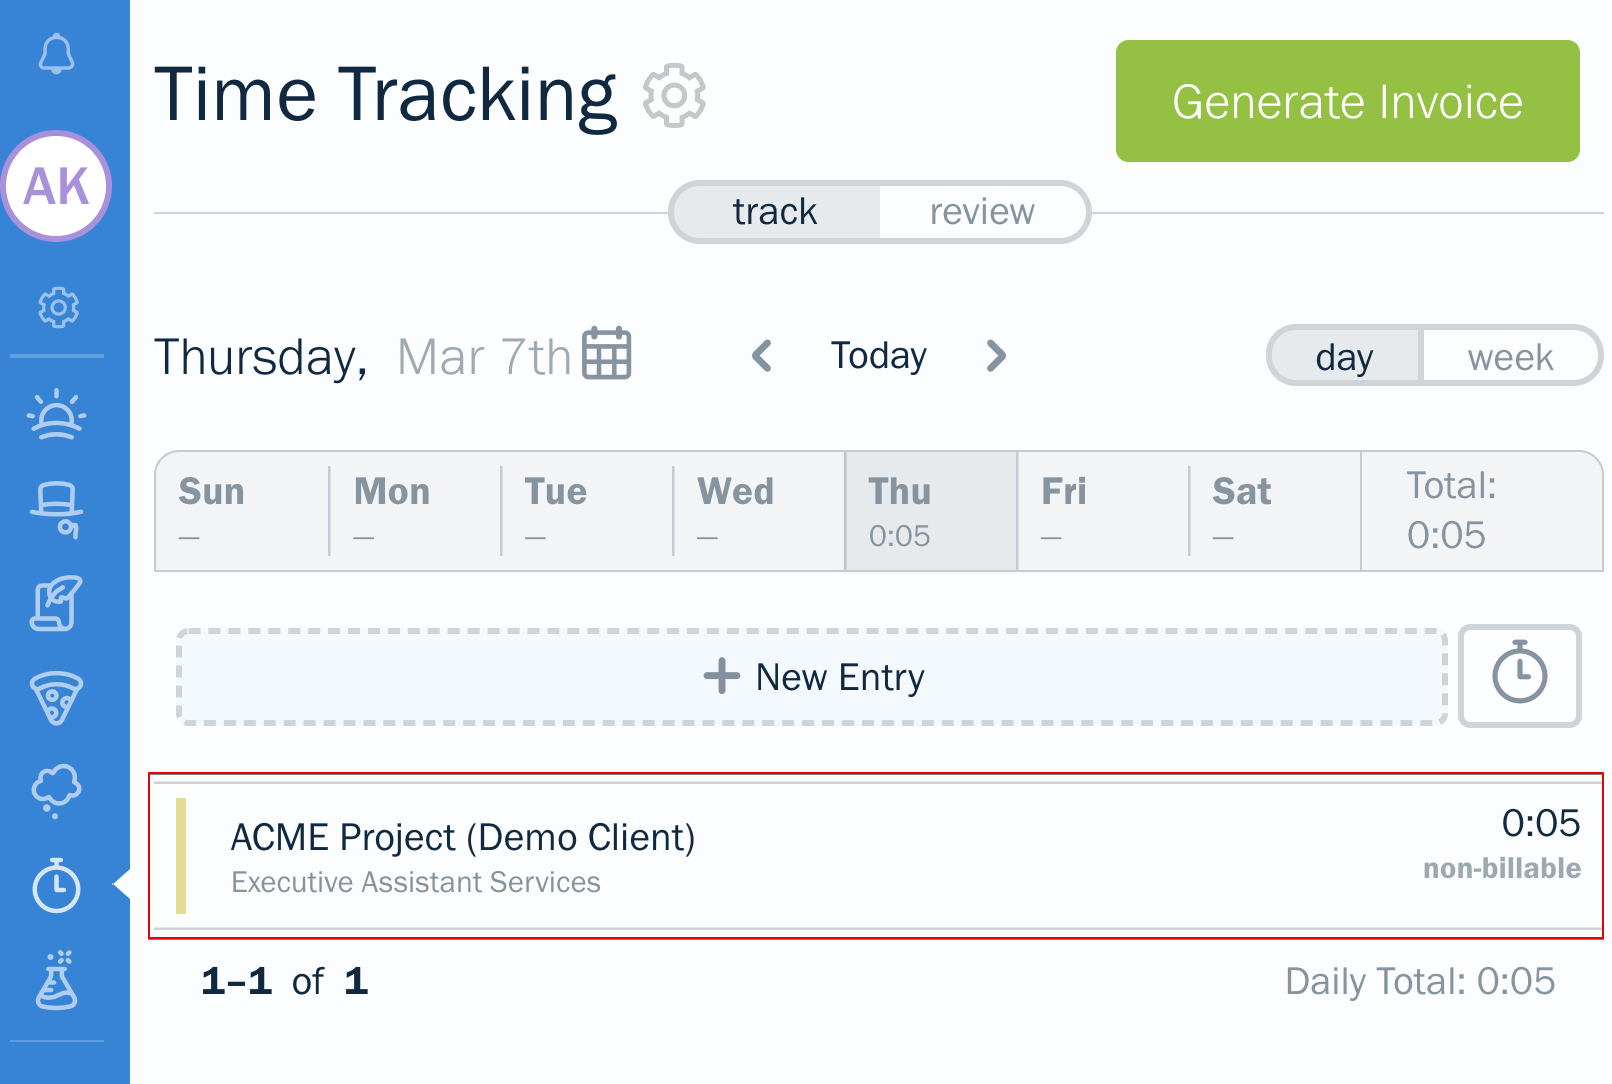
This will send tags you created in ManicTime back to FreshBooks. On FreshBooks you can view transferred time under Time Tracking.
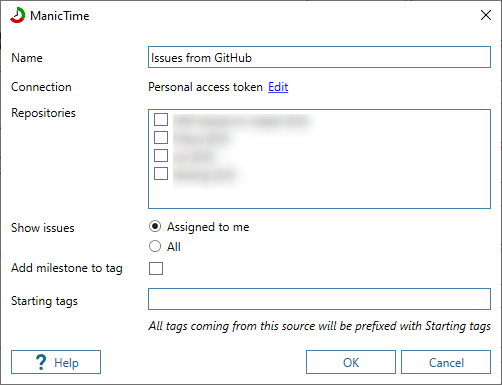
GitHub plugin
Issues from GitHub will show up as tags within ManicTime.
Go to Plugin manager. If it is not under installed plugins you will find it under More plugins tab. Once it is installed, click on Settings button.
To setup a connection, you need to provide your username and password on GitHub. Once you do, you can choose repositories from which issues will be imported.
Issues will have the following format in ManicTime:
[repository name], [milestone], #[no. of issue - name of issue]
Milestone will only be added if you choose Add milestone to tag.
You can leave starting tags empty. Whatever you write in Starting tags will be prepended to issue. For example you can write Work, then all issues will start with Work....
Two factor authentication
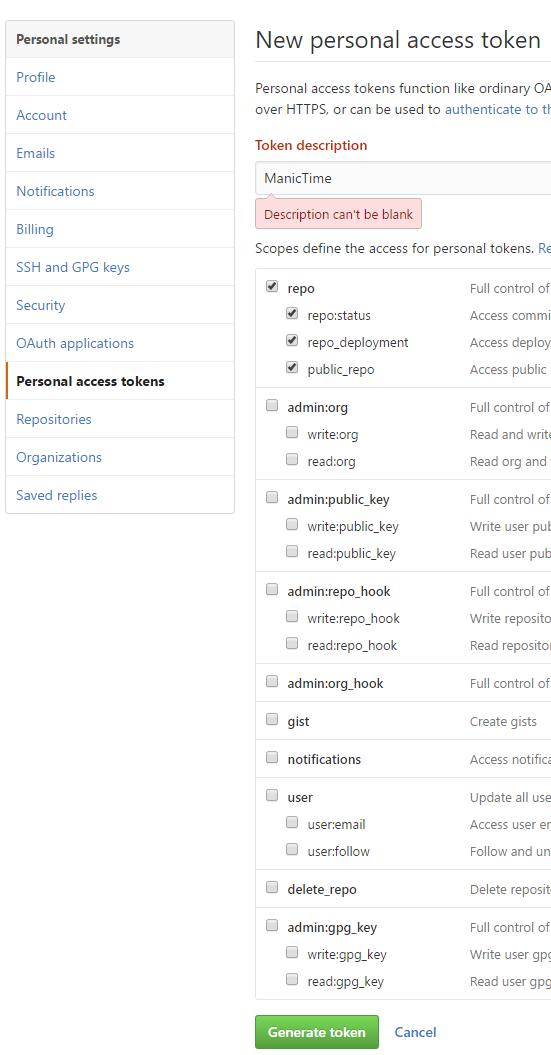
If you are using two factor authentication, then you can still use GitHub plugin by generating a Personal access token. You can generate it in GitHub settings.
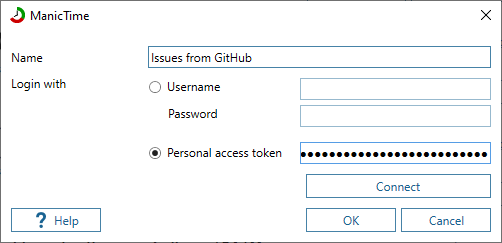
 Then use the token when connecting to GitHub from ManicTime.
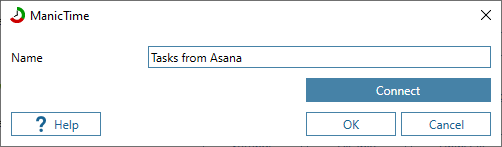
Asana plugin
Note that due to limitations of the Asana API, tasks not assigned to any project are only visible in ManicTime when the “Assigned to me” option is selected for Asana’s Show Tasks setting.
Asana plugin will only take projects and tasks and display them in ManicTime, it does not report back the hours worked on tasks.
To use the plugin you must first install it. You can install it under Plugin manager, More plugins tab. Once it is installed, click on Settings.

Then click on Connect
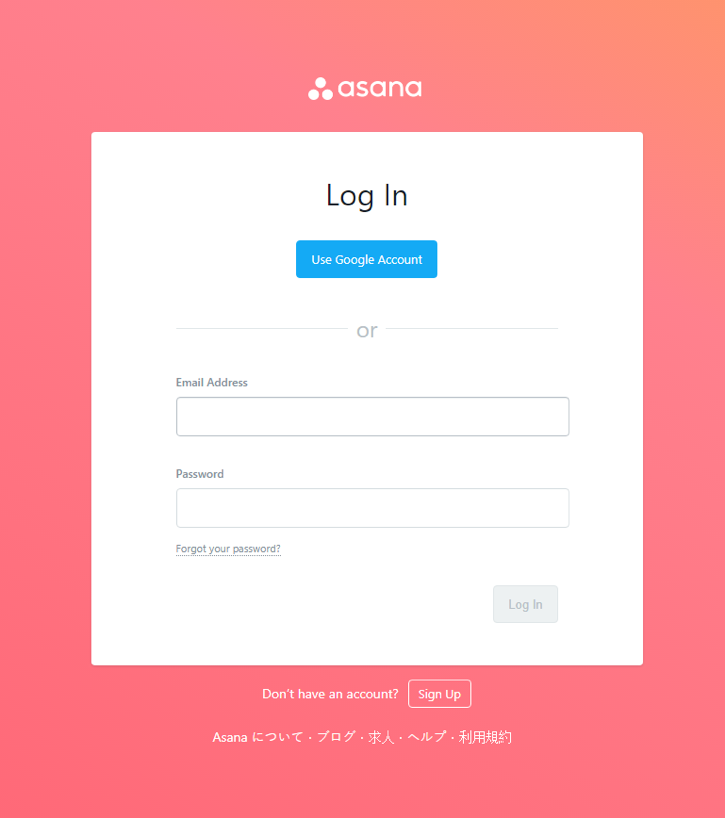
Asana login page will open in a browser. Login to complete the connection.
After you successfully login, you should see a message similar to:

We suggest you prefix tags coming from Asana with "Asana" tag, so you can later identify them in Add tag window. Tags from Asana will look like
<any preceding tag you defined>, Project from Asana, Task from Asana [id]
Then open Add tag window and type Asana in tag field to filter by Asana. Create a tag.

Azure DevOps plugin
Azure DevOps plugin will only take projects and tasks and display them in ManicTime, it does not report back the hours worked on tasks.
To use the plugin you must first install it. You can install it under Plugin manager, More plugins tab.
Once it is installed, click on Settings.
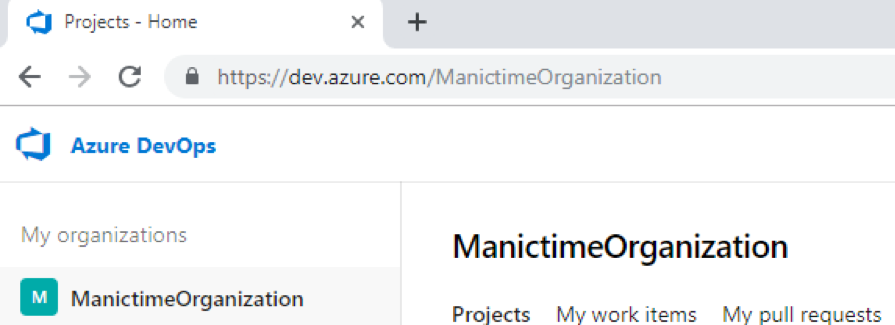
You need to enter your Azure DevOps Organization, so for example "ManictimeOrganization".
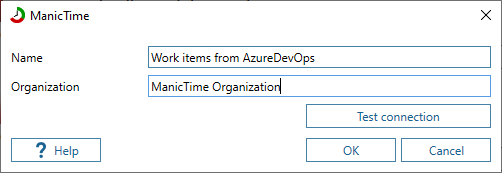
You can see your organization name under My organizations
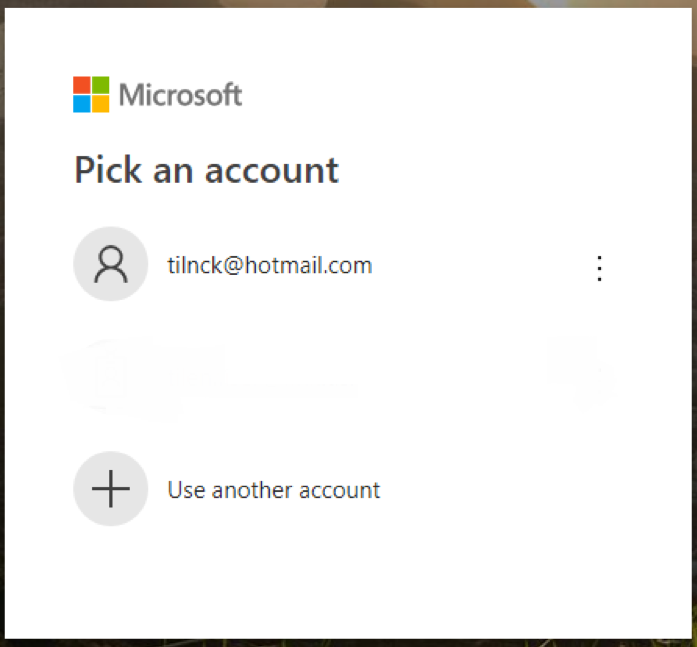
 Then a Login window will open, where you need to confirm access to this account.
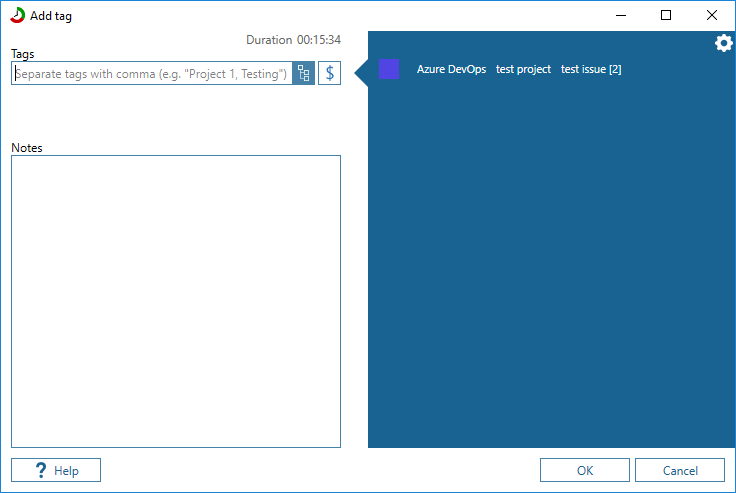
We suggest you prefix tags coming from Azure DevOps with "Azure DevOps" tag, so you can later identify them in Add tag window. Tags from Azure DevOps will look like:
<any preceding tag you defined>, Project from Azure DevOps, Task from Azure DevOps [id]
Then open Add tag window and type "Azure DevOps" in tag field to filter by "Azure DevOps". Create a tag.
Basecamp plugin
Basecamp plugin will only take projects and tasks and display them in ManicTime, it does not report back the hours worked on tasks.
To use the plugin you must first install it. You can install it under Plugin manager, More plugins tab. Once it is installed, click on Settings.

Then click on Connect
 Basecamp login page will open in a browser. Login to complete the connection.
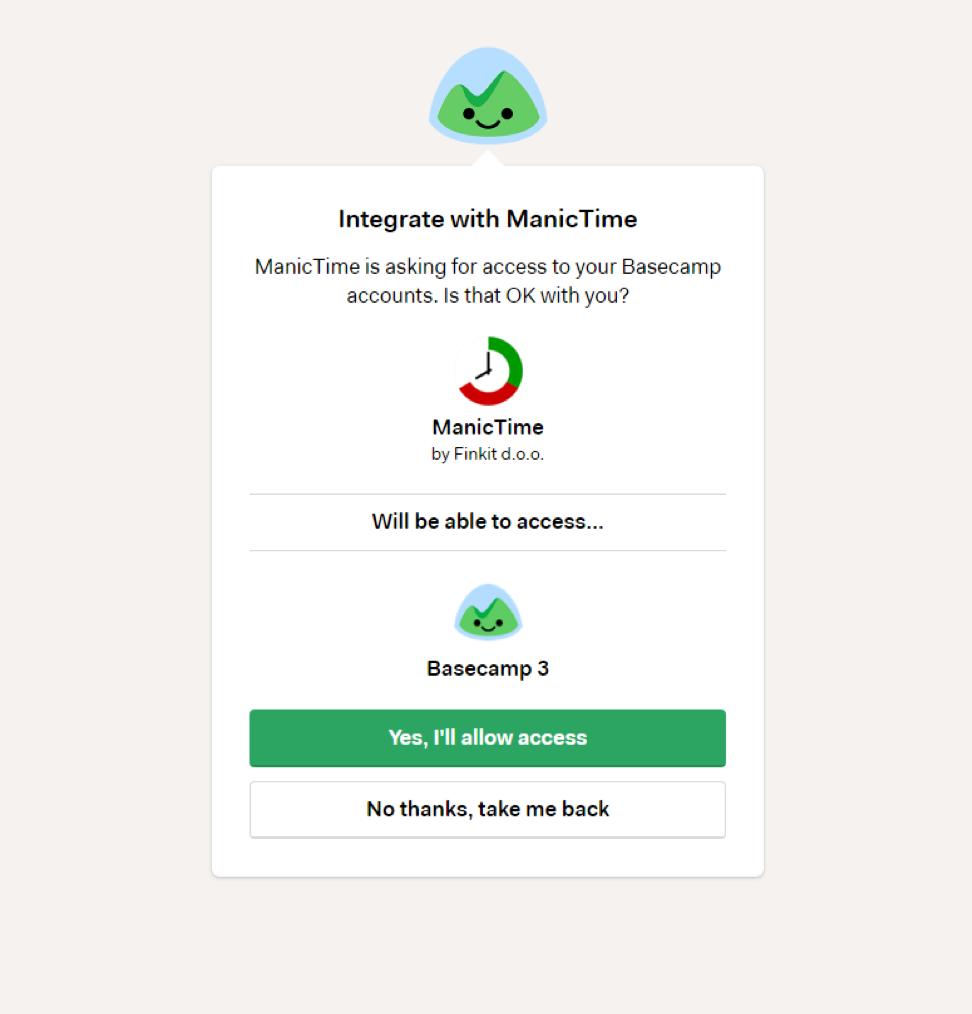
After you successfully login, you should see a message similar to:
 We suggest you prefix tags coming from Basecamp with "Basecamp" tag, so you can later identify them in Add tag window. Tags from Basecamp will look like
<any preceding tag you defined>, Project from Basecamp, Task from Basecamp [id]
Then open Add tag window and type Basecamp in tag field to filter by Basecamp. Create a tag.
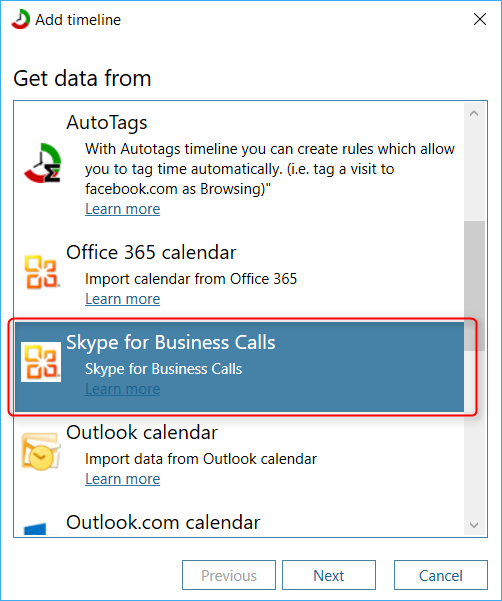
Skype for business plugin
To use Skype for business plugin, go to Plugin manager, "More plugins" tab and install it. Then go to Timeline editor (icon just above the timelines, in top left corner) and add Skype for business plugin. After you add it, calls you made with Skype for business will show up on its own timeline.
This plugin only works with Office 365, it will not work with a locally installed Exchange server.
Harvest plugin
To use the plugin you must first install it. You can install it under Plugin manager, More plugins tab.
Once it is installed, click on Settings.

Then all you need to do is click Connect.

After you click Connect, a browser should pop up.
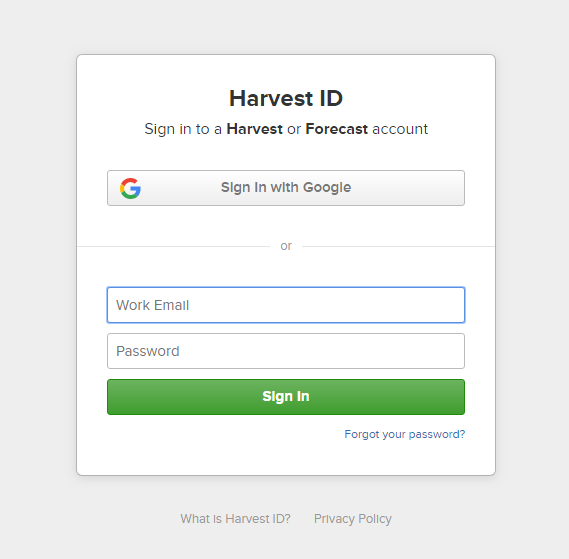
After the successful login, you need to authorize ManicTime access to Harvest.
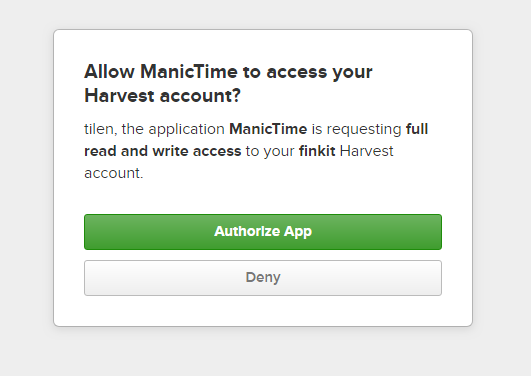
If authorization was successful, you should see this message.

Back to ManicTime, where connection window should update with additional settings, where you can choose projects which will show up as tags in ManicTime.

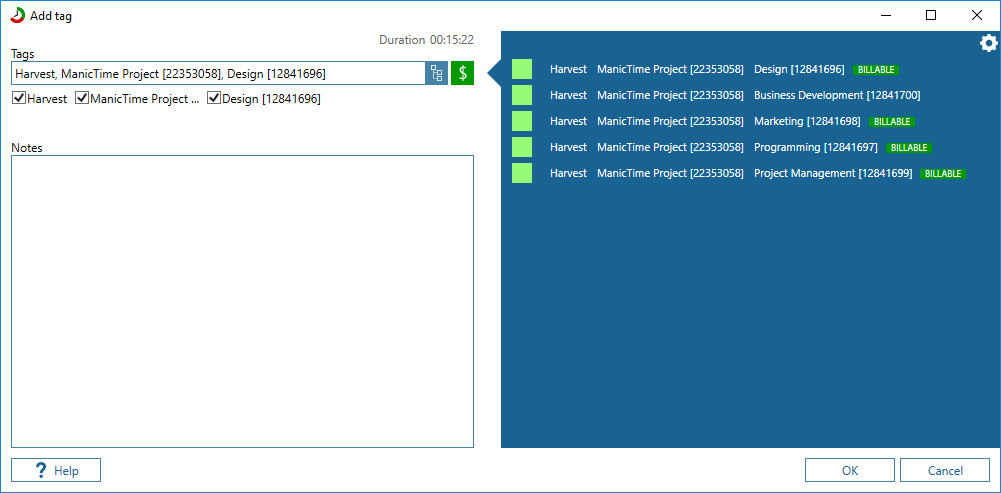
We suggest you prefix tags coming Harvest with "Harvest" tag, so you can later identify them in Add tag window. Tags from Harvest will look like:
<any preceding tag you defined>, Project from Harvest [Project Id], Task [Task Id]
Then open Add tag window and type Harvest in tag field to filter by Harvest. Create a tag.
Then go to plugins -> Tasks from Harvest -> Save work
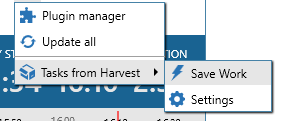
This will send tags you created in ManicTime back to Harvest.
Connectwise plugin
To use the plugin you must first install it. You can install it under Plugin manager, More plugins tab.

Once it is installed, click on Settings
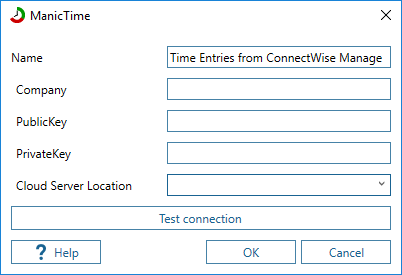
Filling connection details
Then you need to fill the requested fields:
Company is the same as in the Connectwise Manage login screen.
To obtain your public and private key, log into Connectwise and click on your user in the upper right hand corner, then go to My Account. Click on the API Key tab and generate a new API Key. Save it somewhere, because if you don’t, you will have to create new API key (you can see private key only one time).
Warning: Do not use Api members as ConnectWise documentation states that time entries cannot be created for them.
- The last part you need to know to integrate ManicTime with Connectwise Manage is to know where you server is located.
The possible locations for servers are:
- au.myconnectwise.net (Australia)
- eu.myconnectwise.net (Europe)
- na.myconnectwise.net (America)
- staging.connectwisedev.com (Staging) - used for testing
If you don't know which one to choose, you can find it like this:
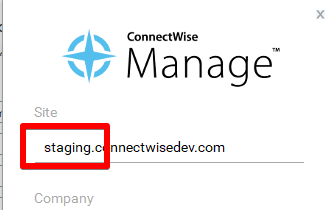
If you use Desktop App, you can see this in the login screen:
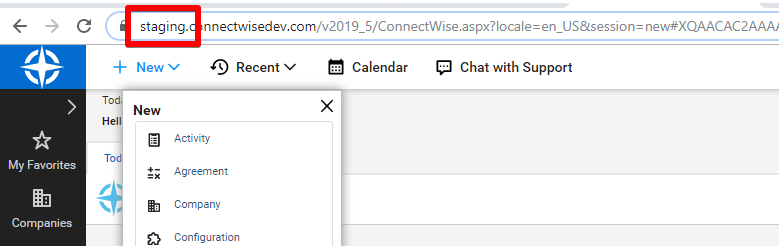
If you use browser to access Connectwise Manage you can see your server location at the start of the URL.
The 3rd option, where you can see your server URL is, if you go to system settings and then click My Company and scroll to the bottom of the screen where you will see your Server URL in the Miscellaneous Options section under Site URL For Manage.

That is all the setting ManicTime requires to successfully integrate with Connectwise Manage. All you have to do next, is to click Connect.
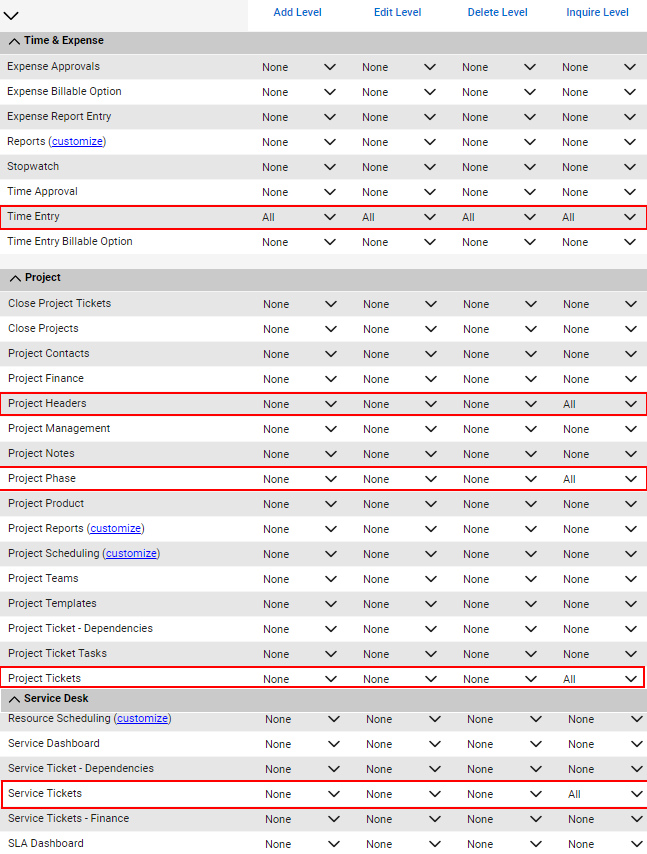
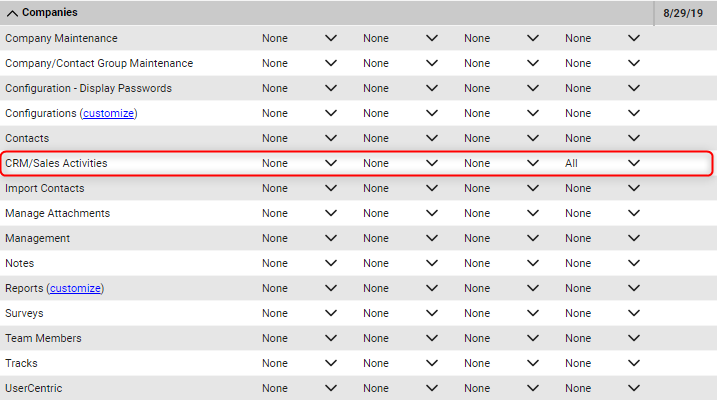
Permissions
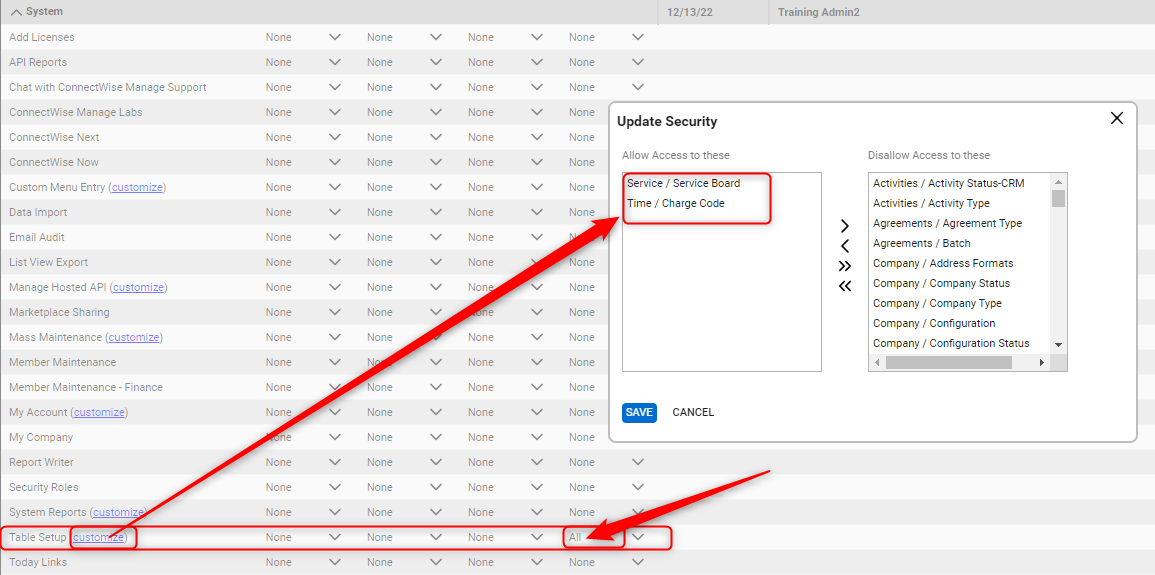
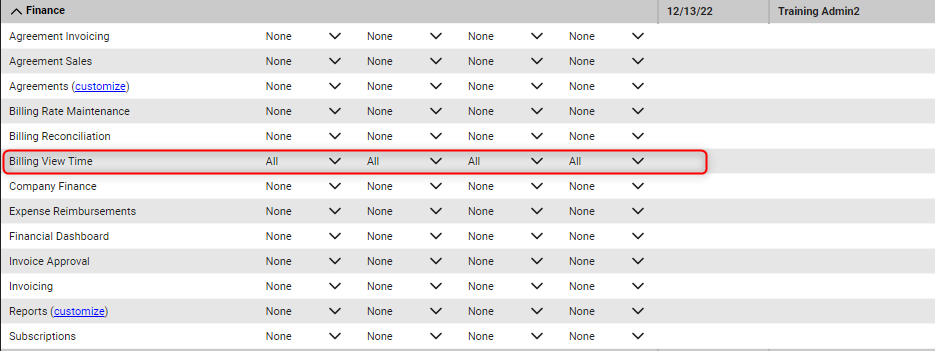
The following permissions are needed in the Role ID profile to successfully integrate ManicTime with Connectwise Manage:
Configure plugin in ManicTime
If you filled everything correctly, then after you press "Connect" the window should update with additional settings where, you can choose which tags you want to see in ManicTime.
If you want to select individual items, you can click Custom button, which will open all available items.
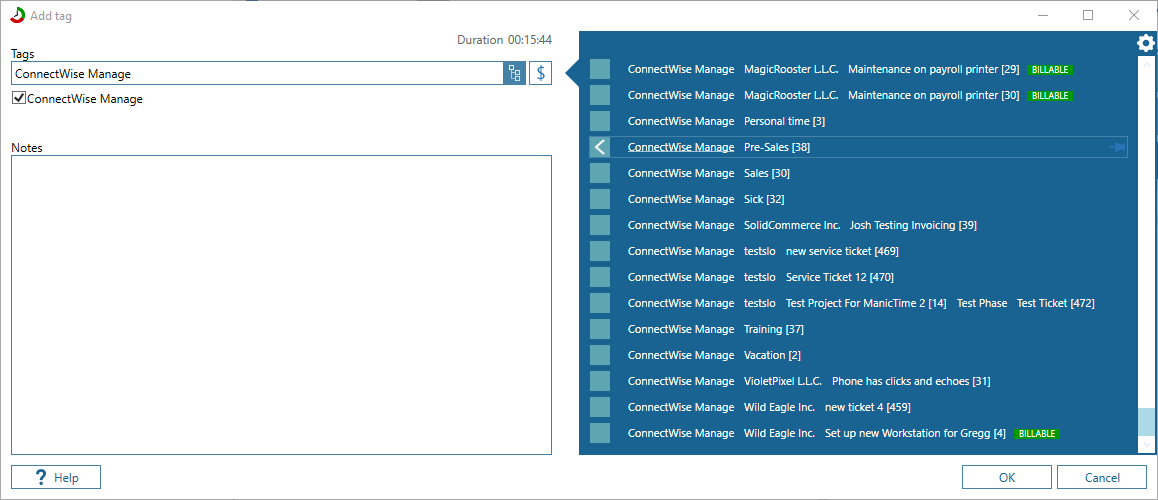
We suggest you prefix tags coming from Connectwise Manage with "Connectwise Manage" tag, so you can later identify them in Add tag window.

Using Connectwise tags in ManicTime
Tags from Connectwise Manage will look like:
Charge Codes:
<any preceding tag you defined>, Charge Code [Charge Code Id]
Service Tickets:
<any preceding tag you defined>, Company from ConnectWise Manage[ Company Id], Service Ticket [Service Ticket Id]
Project Tickets:
<any preceding tag you defined>, Company from ConnectWise Manage, Project [Project Id], Phase, Project Ticket [Project Ticket Id]
Then open Add tag window and type Connectwise Manage in tag field to filter by Connectwise Manage. Create a tag.
Syncing tags back to Connectwise
After you make some tags, go to plugins -> Time Entries From Connectwise Manage -> Save work
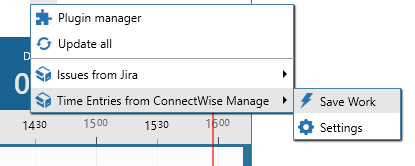
This will send tags you created in ManicTime back to Connectwise Manage. On Connectwise Manage you can view transferred time in the Time Entry Search option under Time & Expense tab.

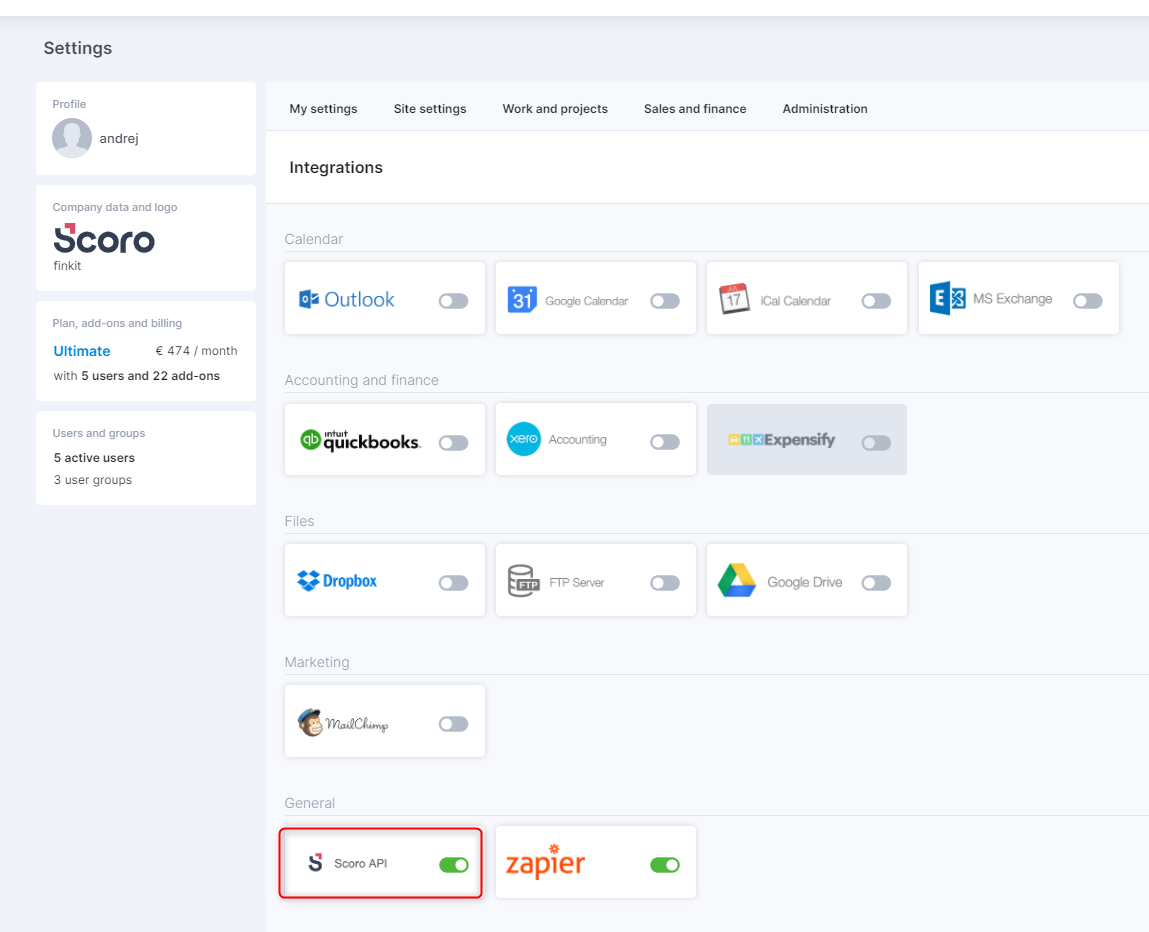
Scoro plugin
To use Scoro plugin in ManicTime, you first need to “Enable API” in Scoro. To do this you need to go to Settings, and then under Site settings click Integrations.
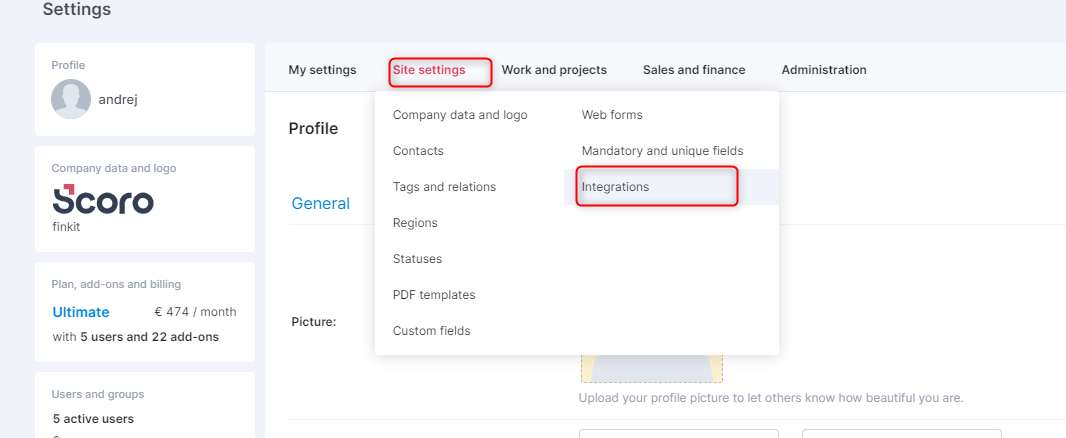
Then click Scoro API and follow their instructions.
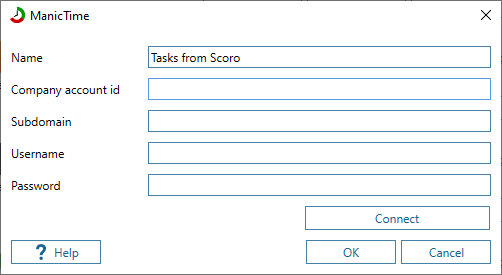
To use the plugin you must first install it. You can install it under Plugin manager, More plugins tab.
Once it is installed, click on Settings.

Then, you need to fill out Company account id, Subdomain, Username and Password.
Subdomain can be found in your Scoro URL (https://.scoro.com) and Company account id under Scoro API integration settings.
Then click Connect and the window should update with additional settings, where you can see from which projects you want see tasks as tags in ManicTime.
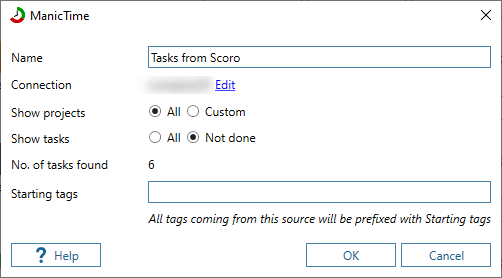
We suggest you prefix tags coming from Scoro with "Scoro" tag, so you can later identify them in Add tag window.
Tags from Scoro will look like
<any preceding tag you defined>, Project from Scoro, Task from Scoro[id]
<any preceding tag you defined>, Task from Scoro[id]
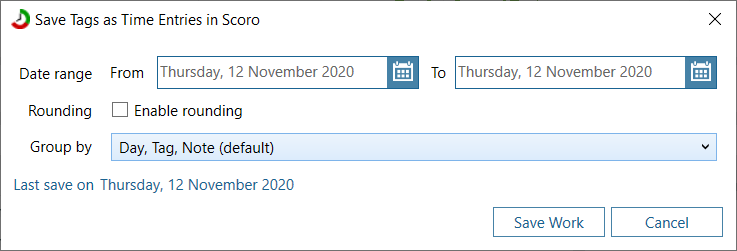
You can also send tags back to Scoro as time entries. All you need to do, is to go to Plugins -> Tasks from Scoro -> Save work
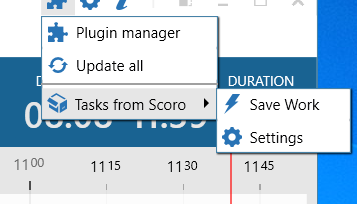
And then a screen will pop up, where you can choose, for which days you want to send tags as time entries to Scoro and if you like to round time or group tags.
WorkflowMax plugin
To use the plugin you must first install it. You can install it under Plugin manager, More plugins tab. Once it is installed, click on Settings.
Then, you need to do is click Connect to authenticate.
After that you select which jobs you want to see as tags
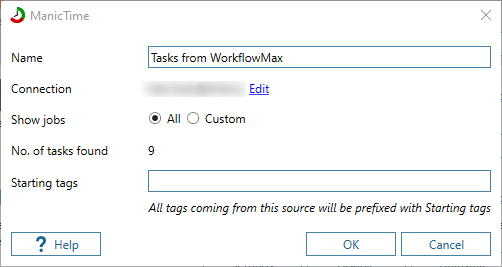
We suggest you prefix tags coming from WorkflowMax with at least " WorkflowMax " tag, so you can later identify them in Add tag window. Tags from WorkflowMax will look like
<any preceding tag you defined>, Client, Job[Id], Task[id]
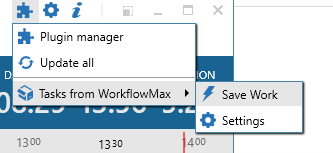
You can also send tags back to WorkflowMax as time sheet entry. All you need to do, is to go to Plugins -> Activities from WorkflowMax -> Save work.
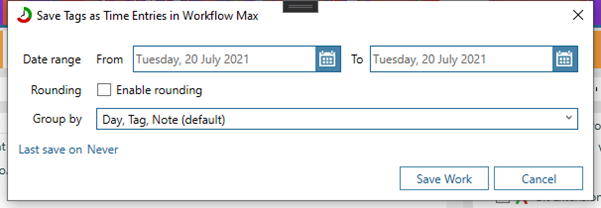
And then a screen will pop up, where you can choose, for which days you want to send tags as time entries to WorkflowMax and if you like to round time or group tags and what do you want to send as time activity’s description back to WorkflowMax.
Custom plugin
You can also write custom plugins. To learn more about this, take a look at this sample project.
https://github.com/manictime/manictime-client-plugin-example