Overview
In ManicTime tags are used to track work. Timesheet is a view optimized just for tags, which allows you to generate different work reports.
Lets look at how it works. For example lets say these are my tags for the week:
| Date | Tag | Duration |
|---|---|---|
| Aug 18 | Client 1, Project 1, Design Note: Home page design for www.projectone.com |
4h |
| Client 1, Project 1, Testing Note: Testing server connection |
4h | |
| Aug 19 | Client 1, Project 1, Testing Note: Testing server connection |
4h |
| Client 1, Project 2, Design Note: Application UI design |
4h | |
| Aug 20 | Client 1, Project 3, Meeting Note: Discussing integration with their current environment |
4h |
| Client 1, Project 2, Design Note: Application UI design |
4h | |
| Aug 21 | Client 1, Project 3, Meeting Note: Discussing UI |
8h |
| Aug 22 | Client 1, Project 1, Testing Note: Testing compatibility with their environment |
8h |
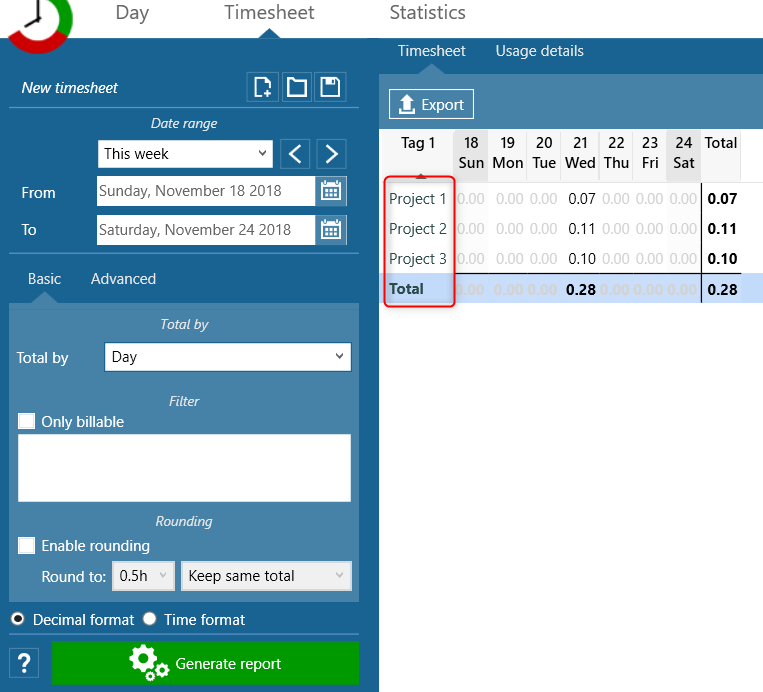
For the first report lets just set the date range and click Generate report. This is what I get:
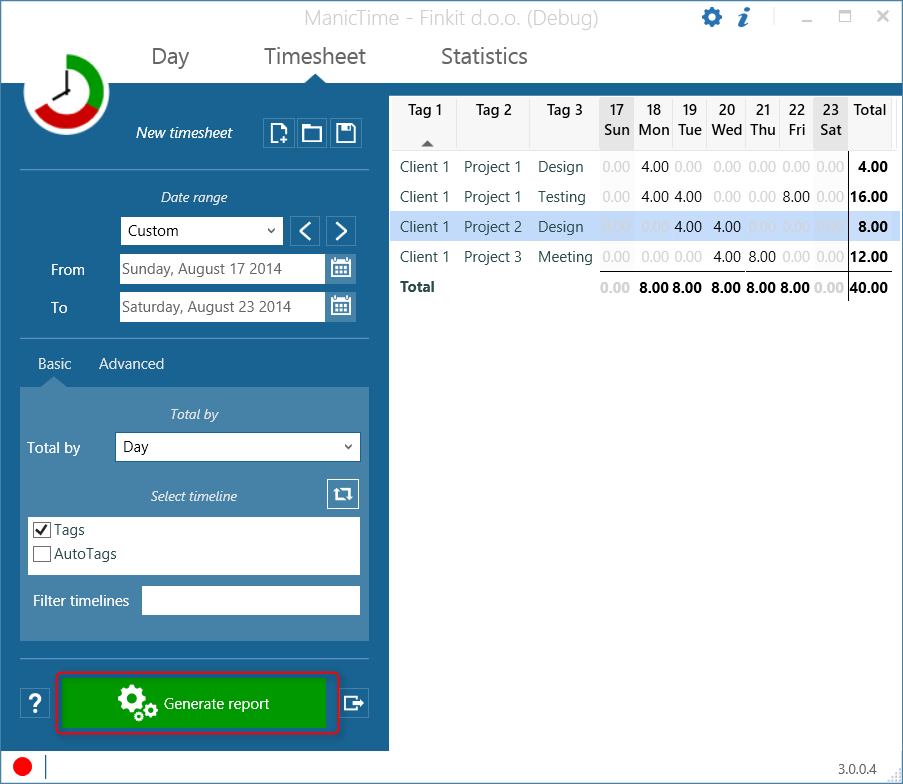
From this view I can clearly see that I worked on Client 1, Project 1, Testing on Monday, Tuesday and Friday, a total of 16hrs.
You probably noticed that all I only worked for Client 1. Now lets say our boss asks us for a report showing just projects for Client 1, nothing else.
Group by
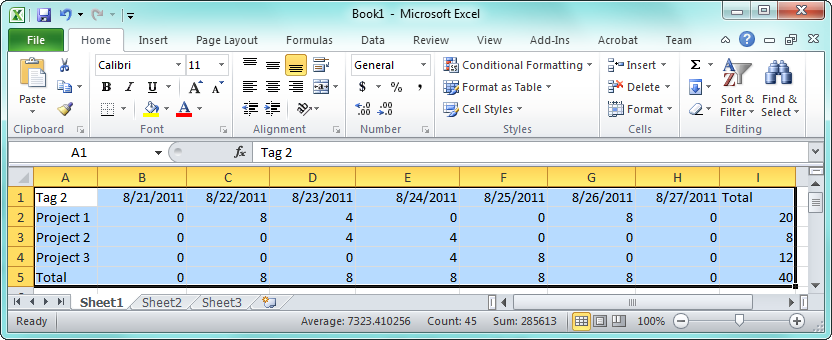
In ManicTime tags are separated by comma. So we could say that tag 'level 1, level 2, level 3' is three levels deep. In the sample data, second tags were always projects, so in the field Group by I can now choose Second level tags instead of All tags. This will produce the following output:
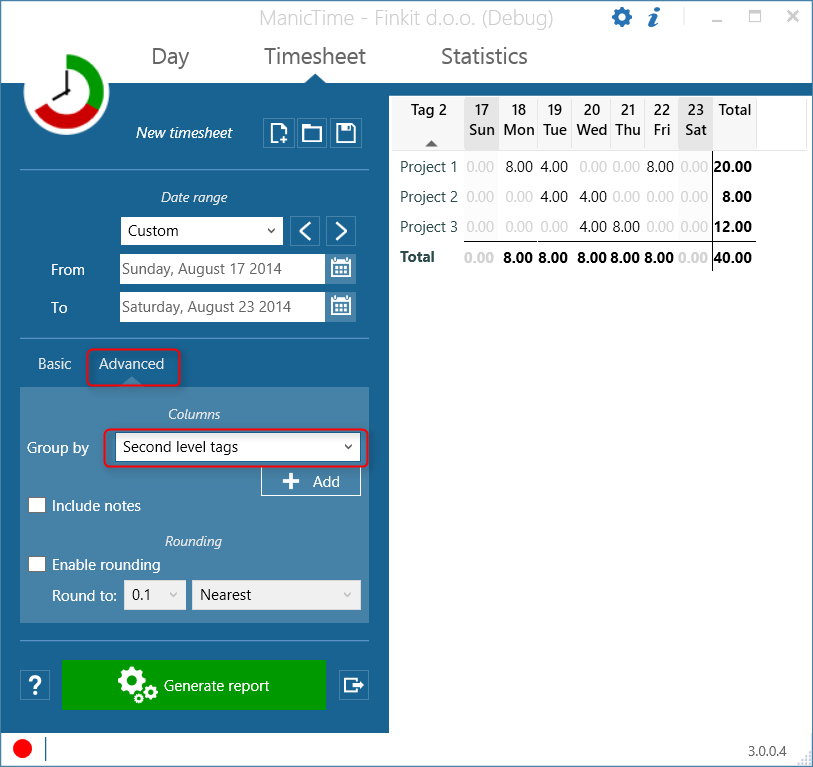
Grouping fields allow you to specify by what to group, before ManicTime starts adding up time.
You have an option to group by different fields. Given this tag:
Tag:"Tag 1, Tag 2, Tag 3, Tag 4"
Note:"Sample note"
Start:"8/25/2011 10:00AM"
End:"8/25/2011 11:00AM"
following would be the output of different options:
- All tags - Tag 1, Tag 2, Tag 3, Tag 4
- First level tags - Tag 1
- Second level tags - Tag 2
- Third level tags - Tag 3
- Fourth level tags - Tag 4
- Note - Sample note
- Day - 25
- Month - 8
- Year - 2011
- Timeline - Beside local tags, Timesheet can also be used to generate reports for Autotags and server Tag timelines. This option is useful if you generate report from two or more timelines, where you need to see how much work came from one timeline and how much from the other.
Total by
By changing Total by field you are telling ManicTime that when it start adding time up, it should sum it by day, or by month...
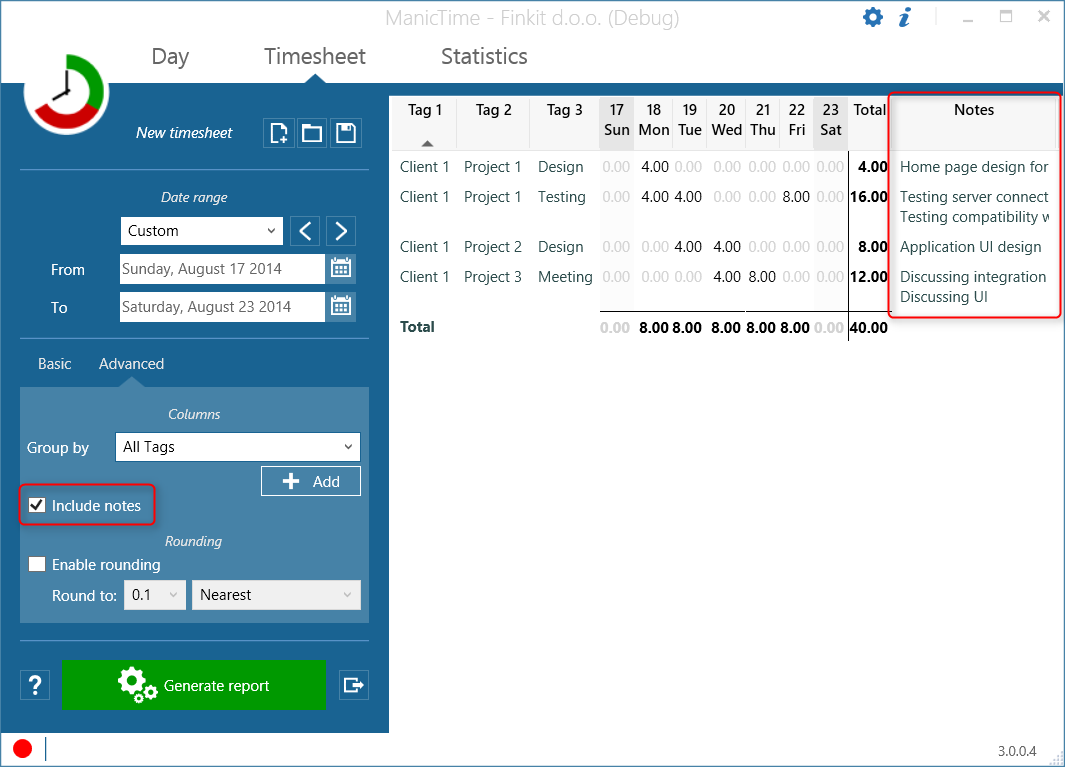
Include notes
When include notes is checked, all the different notes will be appended to the end of the table, each in its own line. This is useful if for example you just want to see how much time you worked on a Project and all the notes you wrote during that time.
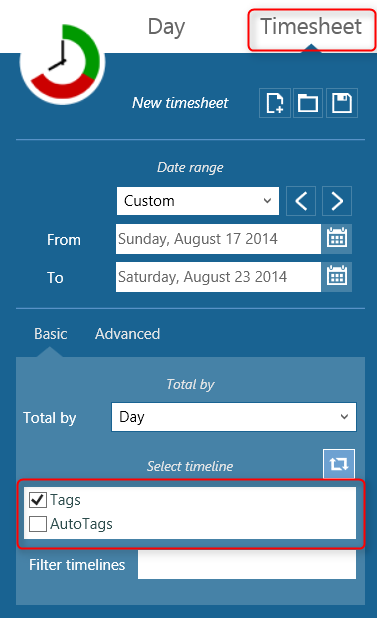
Select timeline
Select timeline field will show up if you have either Autotag timeline or established connection to a server. By default it will be hidden and it will work on local tag timeline data. When you have established connection to the server, server timelines will automatically appear in the list-box.
Rounding
Creating tags by dragging on the timelines produces tags which are accurate to a second. Some users like to manually enter tags which are always rounded to half an hour for example. What we like to suggest, is that you keep tags accurate to a second, then round them on export. This way it is much easier to enter tags and your reports will be as accurate as they can be.
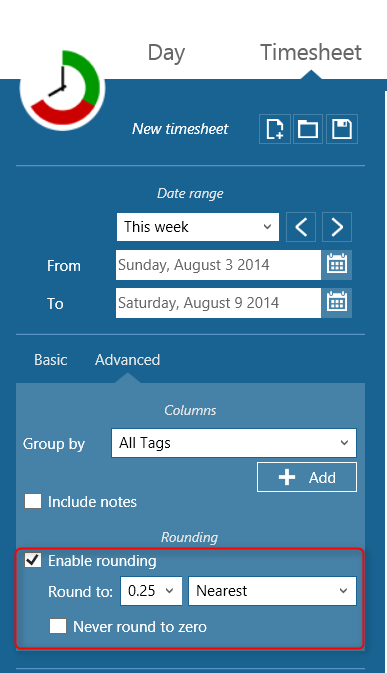
To round values in the timesheet, check Enable rounding. There are two settings, the value you want to round to and how ManicTime performs the rounding:
- Nearest - each value in the timesheet will be rounded to the nearest value
- Top - each value will be rounded to top
- Bottom - each value will be rounded to bottom
- Keep same total - If the original sum for example is 154.56, ManicTime will try to manipulate the data so that the total will be around 155. Usually this has very similar results as Nearest option
Never round to zero option
Use this option if you always want to bill the minimum amount. Below you can see the difference if rounding is set to one hour.
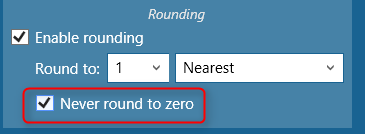
| Tag | Rounding disabled | Round to nearest | Round to nearest with Never round to zero |
|---|---|---|---|
| Client 1 | 0.07h | 0h | 1h |
| Client 2 | 1.25h | 1h | 1h |
| Client 3 | 1.75h | 2h | 2h |
Include unrounded option
When checked, each column will show two values, rounded and unrounded (in parenthesis). When exporting to Excel, rounded and unrounded values will be in two separate columns.
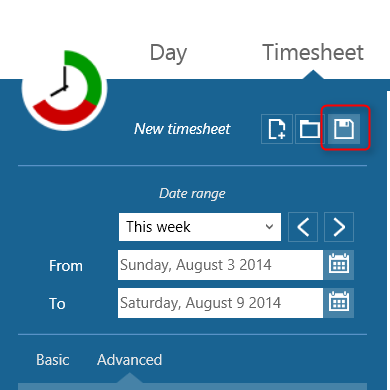
Saving timesheets
Usually we make the same reports every week/month and it would be a shame to set it up every time. So once you are satisfied with the report, save it. When you click on save, ManicTime doesn't save the report, just the settings on the left hand side used to generate it, so you can reuse it next week/month. To save the report, click on Save button at the top.
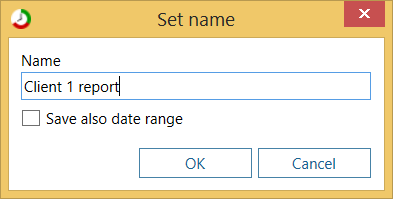
You'll be asked to provide a name. You can also choose to save the date range with the report. If you do, next time you load the report Date range will also be applied.
To load a timesheet, click on the Load button (next to the Save) and choose timesheet to load.
Filter timesheets
Filter works in the same way as on the Day view or Advanced search.
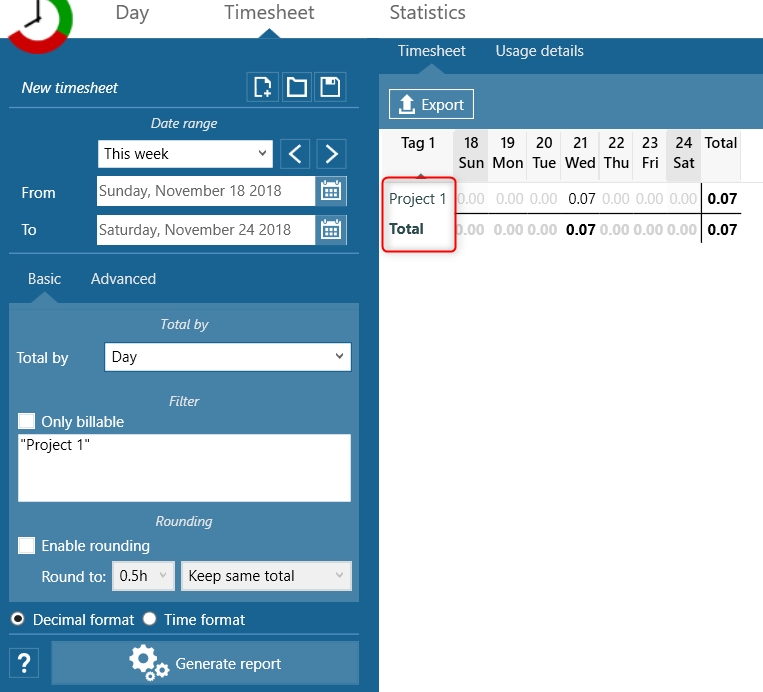
For example let's take this timesheet without a filter.
Now let's say I want to filter by just Project 1. I can type "Project 1" into filter box and generate report again.
Similarly, if I want to include everything except Project 1 I can use -"Project 1".
Filtering on tags in specific place
We had a question if its possible to filter tags, which for example have tag "Pizza" in third place, so for example:
match - "Personal, Lunch, Pizza"
not a match - "Personal, Pizza"
It is possible with the use of regular expressions. Here is how to filter for Pizza on 3rd place:
#"^\[^,\]\*, \[^,\]\*, Pizza"
There is extensive help about regular expressions on the web, you can read more about them here.
Here is how you would use it to filter on for tag on 1st place:
#"^Some tag in first place,"
To filter on tag in 2nd place:
#"^\[^,\]\*, Some tag in second place"
To filter on tag on 3rd place:
#"^\[^,\]\*, \[^,\]\*, Some tag in third place"
tag on 4th place:
#"^\[^,\]\*, \[^,\]\*, \[^,\]\*, Some tag in fourth place"
You are probably seeing the pattern by now.
There are two things to beware of:
- There is always space after the comma, then comes the name of your tag
- Casing is important, so there is a difference between Lunch and lunch
And you can use - to include everything except the match.
And when you are satisfied with the report, use the save button at the top to spare yourself the trouble of going through the gibberish above a month later.
Timesheet usage report
Some users want to send detailed report of their work to their customers.
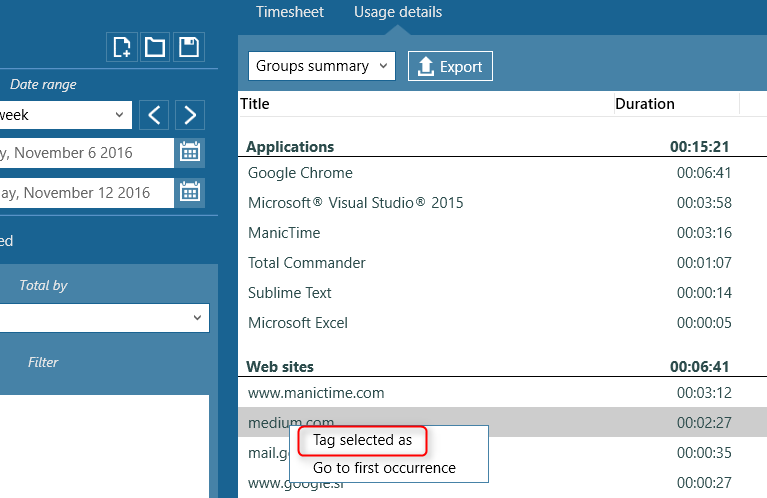
Usage report will show all activities recorded while you were working on the timesheet. To get this report, just create a timesheet, then switch to tab "Usage details". This will create a report, which will include only activities tracked during the time you were working on tags included in the timesheet.
You can export all the details or group the report by Groups or Title.

|
| Computer usage details during timesheet work |
Sometimes you will incorrectly tag an entry. For example my medium.com visit below should not be part of the invoice. To remove it from the invoice, all I have to do is right click on the entry and choose "Tag selected as". Then tag it as something else and refresh the report.
|
| Re-tag a usage to remove it from timesheet |
If you'd like to know when some activity happened, right click on an entry and choose "Go to first occurrence".
Usage report works on Timesheet which was generated from tags or from autotags. It will not work if Timesheet is generated from tag timelines coming from ManicTime Server.
Exporting data from timesheet
Once you generate the timesheet, you have three options to export the data:
- Copy to clipboard
- Export to csv
- Export to QuickBooks
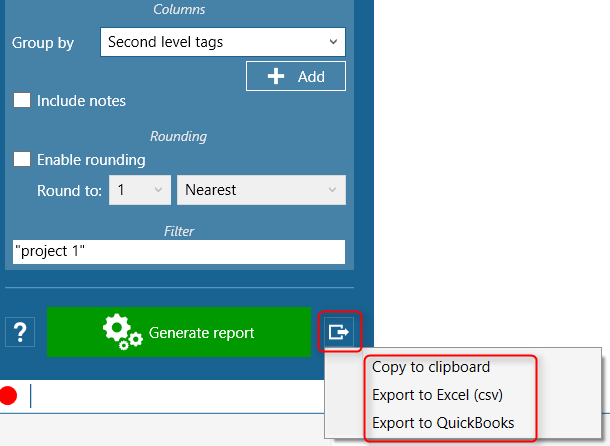
Copy to clipboard
Use this option if you want to copy to Word or Excel. Click on Copy to clipboard, open Word or Excel and paste (Ctrl-V).
You can also Ctrl or Shift click the rows and copy only the rows you want.
Export to csv
Export to csv file. You can use .csv file as an import in many applications.
Export to QuickBooks
Warning! Please take care when using this feature. You have to set the correct values, which you are already using in QuickBooks. QuickBooks will import just about anything, so be extra careful and double check the values you are using or you might end up with a lot of extra data.
When you click Export to QuickBooks, a dialog will pop up.
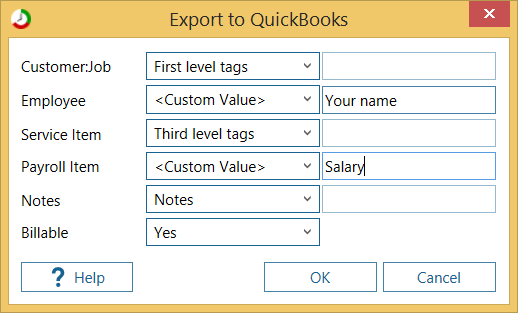
On the left you can see names of the fields as they are presented in QuickBooks. On the right you can choose one of the following options:
- Leave empty
- Custom value - When this is chosen you can enter some text which will be the same for all rows
- First level tags - In tag 'Client 1, Project 1, Activity 1', Client 1 is the first level tag
- Second level tags
- Third level tags
- Fourth level tags
- Notes
Once you click Ok, ManicTime will generate an .iif file which you can then import into QuickBooks. The values you use for export will be saved and loaded next time you use QuickBooks export.