Managing your time effectively is essential for boosting productivity and achieving your goals. ManicTime offers tools to help you track and organize your activities through customizable categories and productivity.
Understanding categories
Categories allow you to group your applications and websites based on how you use them. By assigning categories, you can easily see how much time you're spending on different types of tasks, whether it's for work, personal projects, or leisure.
Required permissions
Permissions required to make changes to productivity or category assignment:
- Content editor
- Administrator
- on personal cloud, each user can do this for themselves.
Automatic categorization
Default -> On cloud: Enabled, On premise - Disabled
ManicTime can automatically assign categories and productivity to any application or website you use. This feature is enabled by default for cloud users, allowing you to start organizing your time right away without any setup.
What is sent to classification service
For those using an on-premise server, automatic categorization is disabled by default. If you choose to enable it on an on-premise server, please be aware that application names and website domains will be sent to classification service for categorization.
Data sent to classification service
For applications:
- Application name
- Process name
- Operating system
For web sites:
- Domain name
No other data is sent to classification service.
Adjusting automatic assignment
To adjust the automatic assignments, go to Administration -> Productivity. Here, you can modify which categories are assigned to different applications and websites to better fit your workflow.
If the default settings don’t meet your needs, you have the option to disable automatic categorization.
Manual categorization
If you want to have your own categories or want more control over how your activities are organized, you can turn off the automatic assignment feature. When you disable automatic categorization, all existing categories will be deleted, and your activities will need to be reassigned manually. This allows you to create and assign your own custom categories tailored to your specific tasks and projects.
To create custom categories:
- Navigate to Administration -> Productivity.
- Disable the Automatic categorization toggle.
- Click on Category tab and then on New Category to create new categories.
- On Unassigned tab assign these custom categories to your applications and websites
If you do not wish to assign specific application or website, you can choose Ignore in the dropdown for productivity and categories.
Team/user specific assignment
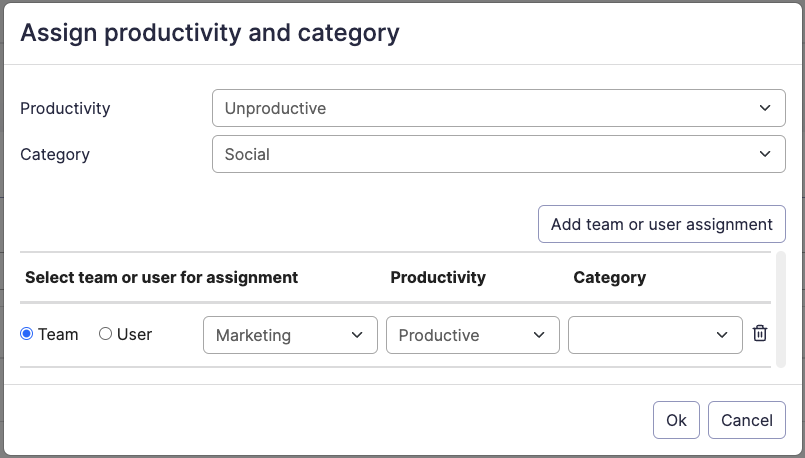
Sometimes you want to have different assignment for specific teams, like facebook.com should be productive for Marketing team. To do that, find facebook.com, then click on Edit link on the same line, then "Add team or user assignment".

Because a user can be in multiple teams, you can set a primary team for a user in Administration, Users. In case of conflicts, primary team settings will win.
