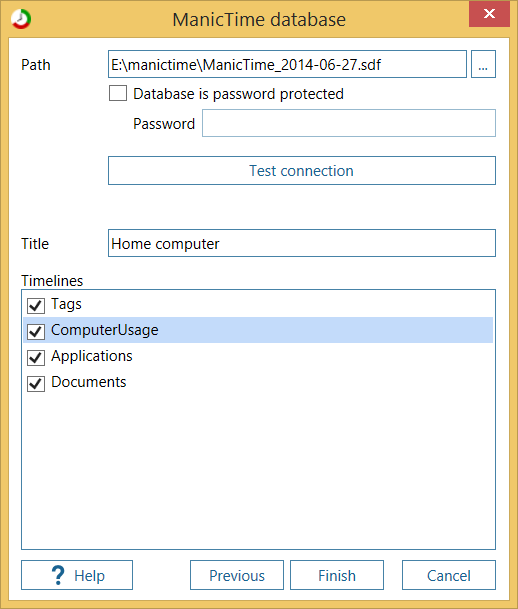
Timeline editor
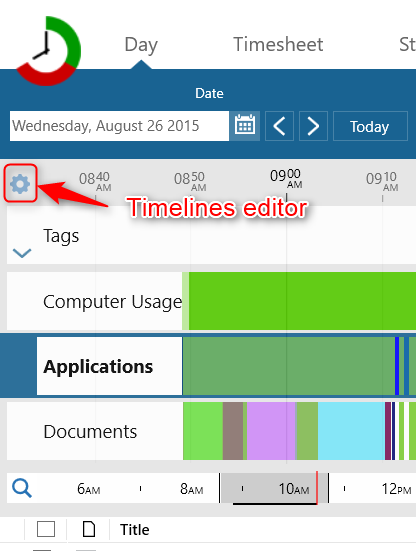
Timeline editor allows you to add or remove timelines as well as change the order in which the timelines appear. To open timeline editor, click on the colorful icon just above the timelines.

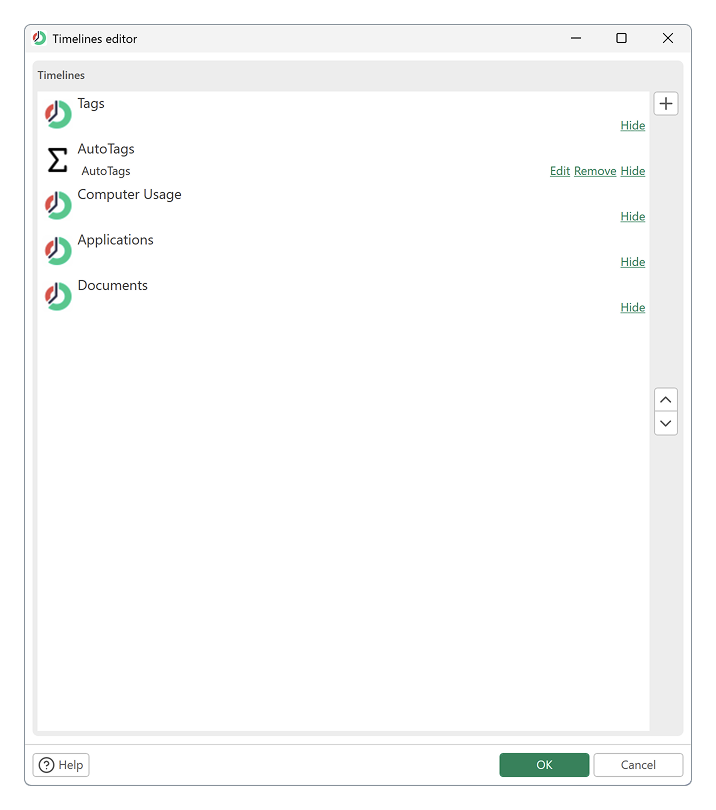
On the Timeline editor you will see the list of timelines currently loaded. For now you can't remove the four default timelines, but you can change the order if you like. To change the order, use the arrow keys on the right. To add a timeline click on Add Timeline button.
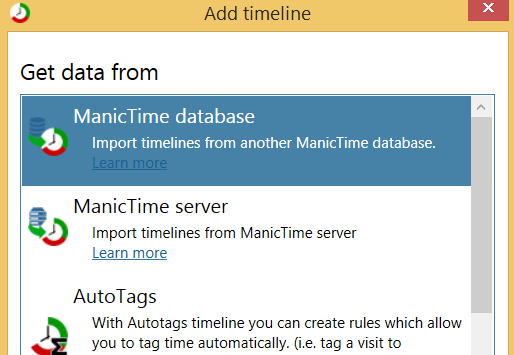
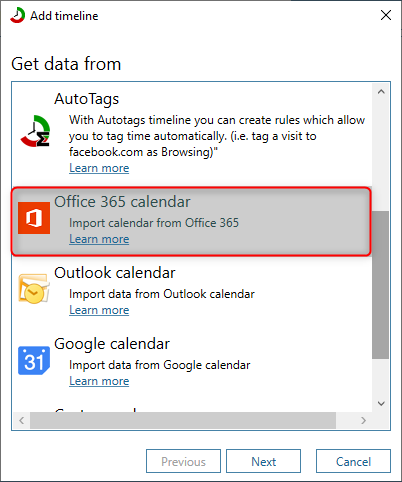
You can add these types of timelines:
- ManicTime database - gets data from another ManicTime database
- ManicTime server timeline - gets data from ManicTime server
- Autotags - used to calculate autotags
- Google Calendar timeline - gets data from Google Calendar account
- Outlook 365 timeline - Import from Office 365
- Outlook.com timeline - Import from Outlook.com
- Outlook Calendar timeline - gets data from local Outlook installation
- Custom timeline - gets data from custom source. Use this if you would like to show data from other sources in ManicTime. For example lets say you have a database with phone calls. You can create a service which will read the phone calls from the database and show them on a separate timeline within ManicTime
Most of these timelines only work when you are online. ManicTime requests the data for each day at the time, nothing is saved to the database. For these timelines statistics are also unavailable.
ManicTime database (ManicTimeReports.db)
Although you can use ManicTime Server to share data between clients, it can be an overkill to set it up for some simple home scenarios. If you just want to combine the data from two databases, lets say create a timesheet from two locations, you can use ManicTime database plugin. It will load timelines from another database.
ManicTime database (ManicTimeReports.db) plugin works with database from ManicTime v4 or later.
ManicTime v4 has two databases, ManicTimeCore.db and ManicTimeReports.db. To show timeline data in ManicTime you only need to transfer ManicTimeReports.db file from the other machine.
On source machine:
- open ManicTime, go to Tools, Advanced, Open db folder.
- copy ManicTimeReports.db and transfer it to the other machine.
- on the other machine, go to Timeline editor and add ManicTime database (ManicTimeReports.db).
- point to the ManicTimeReports.db file you transferred from the other machine and select which timelines to show.
Custom file source timeline (CSV)
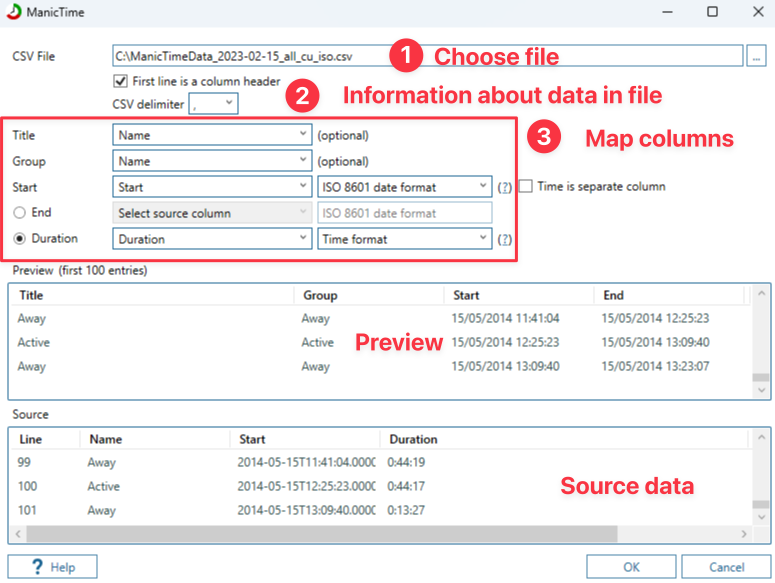
Custom file source timeline gets data from any .CSV file. Use this option, if you'd like to show data from .CSV (comma-separated values) files in ManicTime. To use the plugin:
choose source file
choose delimiter and whether first file is header
map columns in source file to:
- title
- group
- [REQUIRED] start (date and time can be in one column or two)
- [REQUIRED] end (date and time can be in one column or two)
- or duration (instead of end)
Only start and end fields are required.
Preview grid will show columns which are successfully mapped.
Source grid will show data from chosen file.
Once mapping is complete, choose OK and data will show up on its own timeline.
Old ManicTime database timeline (ManicTime.sdf)
Plugin was removed in ManicTime v4.7
Although you can use ManicTime server to share data between clients, it can be an overkill to set it up for some simple home scenarios. If you just want to combine the data from two databases, lets say create a timesheet from two locations, you can use the new ManicTime database plugin. It will load timelines from another database.
Open Timelines editor
Click on Add timeline, then select ManicTime Database.
Once you enter the location of the database, click Test connection and choose the timelines you would like to import. For timesheet you only need to import the Tag timeline.
If you want to use a newer backup you can just close ManicTime, copy new backup over the old one and start it again. MT will then use the new database and load the new data.
Google calendar timeline
Google calendar timeline will get the data from your calendar and display it on a separate timeline. Data is NOT saved locally, so you need to be online to get the data.
To add Google calendar timeline, open Timeline editor, then click Add timeline button, choose Google calendar and click Next.
Next you will be transferred to google where you need to authorize ManicTime to view your calendars.
Then go back to ManicTime and choose which calendars you would like to see.
Office 365 calendar timeline
You can add a timeline representing Office 365 calendar. Open the timeline editor and click on Add timeline.
Use your Office 365 credentials.
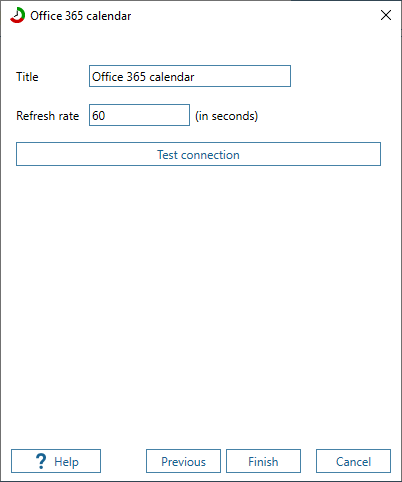
Click Ok, then click Ok again to confirm the changes to timelines. Office 356 calendar timeline should now be visible on the Day view.
Outlook calendar timeline
Outlook calendar timeline will get the data from your local Outlook installation. ManicTime will list all calendar folders in Outlook. Check the ones you would like to show up in ManicTime.
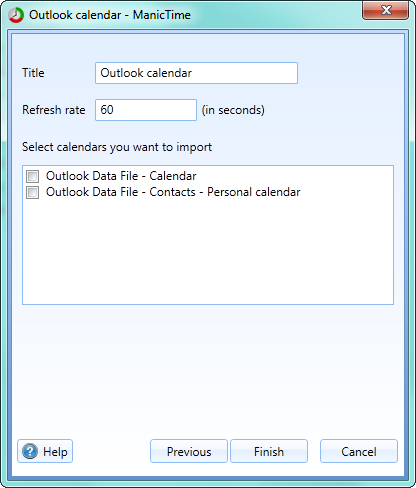
Click Ok, then click Ok again to confirm the changes to timelines. By now new Outlook Calendar timeline should be visible on the Day view.
Custom timeline
Custom timeline gets data from custom service. Use this option, if you'd like to show data from other sources in ManicTime. For example, lets say you have a database with phone calls. You can create a service which will read the phone calls from the database and show them on a separate timeline within ManicTime.
How ManicTime communicates with the service
When you register a plugin you need to provide an URL of your service. URL will be called every time the day changes or when Refresh is triggered (based on Refresh rate). For example, lets say sample service URL is:
https://www.madeupdomainname.com/sampleData/CustomTimeline
Every time this service is called, ManicTime will append start and end parameters. For example:
https://www.madeupdomainname.com/sampleData/CustomTimeline?FromTime=2023-03-10T00:00:00&ToTime=2023-03-11T00:00:00
Your service should use these parameters to return only results which match time limitation.
What service returns
Service should return an XML response. Most of the elements are optional, so at the very least service only needs to return start and end times:
<Timeline>
  <Activities>
    <Activity>
      <StartTime>2011-02-15T07:14:09+01:00</StartTime>
      <EndTime>2011-02-15T09:08:29+01:00</EndTime>
    </Activity>
    <Activity>
      <StartTime>2011-02-15T09:08:50+01:00</StartTime>
      <EndTime>2011-02-15T09:21:33+01:00</EndTime>
    </Activity>
  </Activities>
</Timeline>
Example
Use this link in ManicTime:
https://sampletimeline.manictime.com/windows-client/time-only
To add a title and a default color with which they are presented:
<Timeline>
  <Color>1010FF</Color>
  <Activities>
    <Activity>
      <DisplayName>First activity</DisplayName>
      <StartTime>2011-02-15T07:14:09+01:00</StartTime>
      <EndTime>2011-02-15T09:08:29+01:00</EndTime>
    </Activity>
    <Activity>
      <DisplayName>Second activity</DisplayName>
      <StartTime>2011-02-15T09:08:50+01:00</StartTime>
      <EndTime>2011-02-15T09:21:33+01:00</EndTime>
    </Activity>
  </Activities>
</Timeline>
Example
Use this link in ManicTime:
https://sampletimeline.manictime.com/windows-client/times-and-title
Default timelines in ManicTime have activities which belong to groups. On day view you can see activities on bottom left side, and groups on bottom right side. For example, Firefox is a group, individual page you visited is an activity. You can also add groups to the XML response. So a response with groups and activities would look like:
<Timeline>
  <Color>1010FF</Color>
    <Activities>
      <Activity>
        <GroupId>1</GroupId>
        <DisplayName>Visit to Google home page</DisplayName>
        <StartTime>2011-02-15T07:14:09+01:00</StartTime>
        <EndTime>2011-02-15T09:08:29+01:00</EndTime>
      </Activity>
      <Activity>
        <GroupId>2</GroupId>
        <DisplayName>Visit to Bing home page</DisplayName>
        <StartTime>2011-02-15T09:08:50+01:00</StartTime>
        <EndTime>2011-02-15T09:21:33+01:00</EndTime>
      </Activity>
    </Activities>
    <Groups>
      <Group>
        <GroupId>1</GroupId>
        <Color>FF1010</Color>
        <DisplayName>Firefox</DisplayName>
      </Group>
      <Group>
        <GroupId>2</GroupId>
        <DisplayName>IE</DisplayName>
      </Group>
  </Groups>
</Timeline>
Example
Use this link in ManicTime:
https://sampletimeline.manictime.com/windows-client/activities-and-groups
To get started, you can also take a look at a sample ASP.NET MVC3 project.